 |
||
|
Home Pictures Custom Interior New Bed |
| |
||
|
Home Pictures Custom Interior New Bed |
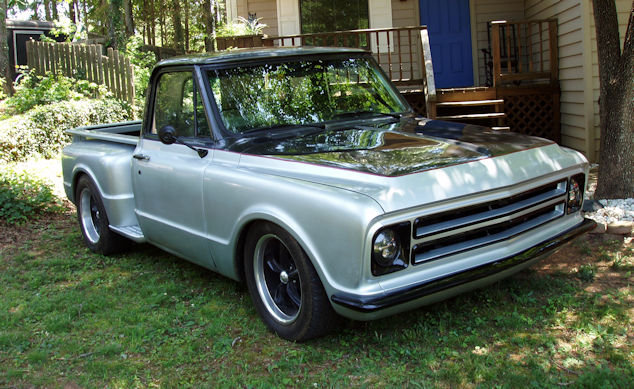
You know how it is, you get a new toy and you canĺt wait to play with it. For me cars are like that. While I love driving my cars, working to make them better is why I have these cars. So it hasnĺt taken long to start to upgrade the Stepside. I will not change anything major on the body but the interior is just way to basic for me. Like I said, no carpet, no headliner and the bench seat make the interior look and feel like a farm truck.
January 9, 2016
The gauge cluster needs work too. I found a rebuilt gauge cluster and ordered it. I also have ordered Sports Seats from Corbeau along with their mounting hardware. Because the truck now has a bench seat in it the Corbeau bucket seats mounting frame will span the width of the interior and the section between the seats will be exposed. I could make custom seat mounts so each seat would mount individually to eliminate this issue but I plan on a center console anyway and that center section will make an easy way to help mount it.
January 15, 2016
The rebuilt gauge cluster came today and it is a thing of beauty, hope it works as good as it looks. Experience tells me getting under the dash is much easier with the seat removed so I will wait to install it until I pull the seat out. After my road test yesterday I decided to get a larger front sway bar from CPP. The truck handles pretty well but Iĺm a sports car guy and there is just too much body lean to suit me. They also make a rear bar but Iĺll wait to see how much the front bar helps before getting that.
January 16, 2016
I got home from our monthly GSRA meeting to find two huge boxes containing the Corbeau Sport Seats and seat frame sitting on my front porch. They look great. The seats are light and the frame is very well built. The instructions say to install the seats on the frame and then put the assembly in the truck. I did manage to get the seats mounted to the frame and have started to figure out the center console layout. It is going to be huge, there is about 13ö between the seats. Of course with the small cab in this truck and a glove compartment that is a joke the huge console will be a plus. With the seats mounted to the frame the whole assembly is pretty heavy, looks like I will be recruiting some help. With the gauge cluster and the seats I will have a few days of work ahead of me.
January 22, 2016
Winter has reared its ugly head. Yeah, even in Georgia we get winter. Even though I have semi-heat in the garage I canĺt seem to get motivated to go out there. I have received several items for the truck, a console top and a cup holder from a 2001-2006 Chevy Tahoe which will become my center console between the seats. I also received a 1.125ö front sway bar from CPP which hopefully will help the body lean of the truck. The lean is not excessive but flatter is better so therefore a bigger bar.
January 25, 2016
Itĺs Georgia and for now winter is over, itĺs in the 50s today. I turned on my garage heater and started fabricating the console. I got the consoleĺs aluminum bottom mounted on the seat frame, used some hinges I had to mount the Tahoe top to a sheet of aluminum which will be the back of the console and riveted that to the bottom. The sides will be a little harder since the top edges bend slightly at the front but it doesnĺt look too difficult to fabricate. The cup holder part will attach to the front of the console but final fabrication will have to wait until the whole thing is in the truck to see how it fits around the transmission hump.
January 27, 2016
Over the past two days I have been working on the console. It has taken more time than I thought but it is progressing. I got the whole frame built and the cup holder in place. I ran out of aluminum sheets for the sides so I am stuck until I get more. Since this thing is so big I am a little reluctant to use panel adhesive to hold it all together but will use it in some places. My plan for final finish is still being debated. Of course the easy way out is to paint it but covering it to match the top and seats would look better. But my skills at upholstery have been less than successful in the past. I may just wait until I get carpet and the headliner installed and let the professional cover it.
February 2, 2016
Console work continues, this could take me the rest of my life! I got much of it glued together and the side panels made. But I ran out of adhesive and local suppliers want a small fortune for it so I ordered on-line at half the price. I think I will make some trim for the side panels which will make the top fit better and should look good.
February 12, 2016
I have spent the past few days working on the ôconsole from hellö. This thing has a mind of its own but the end is in sight. I am adding some 1ö aluminum trim around the edges to give it a more professional look. Iĺm thinking now that the panels will be painted, maybe with wrinkle finish to match the gauge cluster. I have also been cleaning up stuff the PO did inside the engine bay. Mainly electrical stuff. I installed a battery disconnect switch to make it easier to work on anything electrical on the truck in the future. I used a junction block to connect all things that run directly off the battery in the engine bay much like I did on the Z. The PO also did not solder any of his connectors relying on simply crimping them, as an electronic tech this is just wrong, I will fix all that.
February 18, 2016
I am so close to getting this console built. All the metal work is done at long last. I will add some body filler at the seams since the plan now is to paint the trim black. I have ordered some vinyl for the panels that will match the Chevy Tahoe lid.
I installed the CPP sway bar. This didnĺt quite go as easily as I thought. The only real problem was the holes in the lower control arms were too small for the bushings to sit properly. No big deal I just drilled them to 5/8ö but you would think CPP would have provided either bushings that would fit or at least bring that up in the instructions.
I also installed a battery disconnect and a +12v terminal block. I hate headers on street cars! Yeah, they look cool but really add very little in performance and on this engine makes it nearly impossible to get at the +12v cable on the starter to replace it. To get to this I was thinking I may have to remove the starter or pull off the header, but if nothing I am persistent. After trying every combination of tools I have I was able to get it off and the new one installed. While I was under the truck I noticed there is no flex plate cover on the transmission I will see if any of my friends have one they will part with. Speaking of headers these are starting to rust so I will have to address that at some point.
February 21, 2016
Today it is fairly warm so I turned on the heater and pulled the truck out of the garage to paint the console. One coat of primer/adhesion promoter and three coats of satin black wheel paint was applied to the trim pieces. It looks pretty good. The pewter upholstery should be here in a couple days so I can test my skills at installing it. I do not foresee any major issues since all the panels are pretty flat with simple corners.
Next I will attack the brake and fuel lines positions to move them away from the headers. Then address the leaks in the transmission and steering box.
February 23, 2016
I decided to further clean up the engine bay wiring and hide the huge groups of wires behind the inner fenders. The way the truck is built the inner fender sits on top of the wheel wells so the wires will still be protected from the elements. While unraveling the cables I found more shaky wiring. There were a lot of poorly crimped connections which I removed and soldered and added some real connectors is some places. I also found three connections made with house wiring wire-nuts, scary stuff! One thing I found that confused me a little was a mystery connector hidden under a mound of electrical tape. It went nowhere and two of the pins were jumped together. I posted a picture on the message board to see what it was. I was thinking it was possibly for the old voltage regulator that the PO had removed during the engine swap and the jumper was to make the one wire alternator work properly. That was confirmed on the message board. I remove the connector and soldered the two jumped wire together. Two of wire nuts turned out to be replacements for the parking light connector. I am searching for that connector but will temporarily wire the parking light back with the wire nuts. The other wire nut was just laziness on the Vintage Air installer to not make a wire long enough.
February 29, 2016
I finished the console today by applying some dark pewter colored vinyl to the panels and installed the C/10 emblem to the front. Unfortunately once again this went to prove I am not an upholstery guy but it looks decent. But I need to address the brake and fuel lines before they become a safety issue. So the interior upgrades are on hold for now.
March 2, 2016
Some new stuff I have been procuring has started to roll in. I picked up a set of original ĺ69 302 valve covers which will add a bit of authenticity to the engine. To install them I needed grommets for the pcv system which consists of the pcv valve and its hose, the carb spacer with the port for the pcv hose replaces the spacer already on the engine, the breather hose that is installed on the other valve cover and is hooked to the air cleaner and of course an original oil cap. All told it was quite a bit of money just to make the engine look original, but it does look cool.
March 4, 2016
Today was not a fun day! I got a couple things I thought would be easy to installůthey were not. The first thing I was going to install was a new flexible stainless lower radiator hose because the one on the truck was rubbing on the frame. I used one of these on the AMX and it was very easy. The first problem was there is no petcock on the radiator, just a plug that is on the back side of the driver side tank, not on the bottom and there is nowhere for the antifreeze to go but all over the fender wells, steering box, cross members, bumper and any place it decides to go. I will be looking for a petcock with a hose fitting! After doing the best I could to clean up the mess I tried installing what should have been the 1 żö adapter that came with the new hose. It was not a 1 żö at all but a 1 5/8ö and will not fit. I have Emailed the company got it from, probably a waste of time. Okay move on the project two. My transmission cooler is not here yet but I thought I would get the cooler lines from the transmission ready. The plan was to take off the lines from the radiator, cut them and re-flare them so I can extend them to the new cooler. That proved not to be easy at all. They came off the radiator fine but I could not get to the fittings on the transmission because those damn headers are in the way. So I thought maybe I could flare them while they were still on the trucků not gonna happen, just no room. So pull the headers, how hard could that be?ůůvery hard. I started to remove the spark plugs only to find you canĺt get a socket on two of them because of those damn headers. Same is true for the header to head bolts. Surprisingly enough the header flange bolts came off without a fight. Then of course you have to pull the starter to drop the header. It was a battle but I was eventually successful in getting the header out. The transmission lines are installed using an adapter screwed into the transmission and then 5/16 flares are screwed to those. Whoever tightened the flare fitting is much stronger than me or has a tool I donĺt have because I could not break them loose with an open end wrench. So in frustration I cut the lines so I could use a socket and got them off. Of course now I need new lines. So the day is over, I installed nothing and an sitting in front of this computer drinking a beer feeling sorry for myself. LOL.
March 7, 2016
Work on the truck has slowed due to a bit of the flu. But I have managed to get a couple things accomplished. One thing I thought looked really bad in the engine bay was the radiator overflow tank. It was a plastic one sitting right in the middle of the passenger fender well. The hose was constantly getting pulled off any time you tried to access anything on that side of the engine. I picked up a tubular 3x9ö stainless tank similar to what I have on my other two cars, fabricated a bracket that bolts to the battery box putting the tank just behind the passenger side radiator tank.
Since I had to pull the header to reconfigure my tranny lines I hit it with a wire brush on my angle grinder to see if it would clean up, it did. I had to use some sand paper on the places the wire wheel couldnĺt get to but all in all it came out pretty nice. I have some POR-15 high temp paint I bought a while back but never used so I will see how that looks and holds up. But doing one header was stupid so I pulled the other one too.
March 12, 2016
After pulling the headers and cleaning them up the best I could I hit them with the POR-15 high temp paint. They look good compared to how they were but weĺll see how long the paint holds up. I will probably need help getting them reinstalled. For gaskets I chose Remflex graphite manifold gaskets and some FelPro for the collectors.
March 13, 2016
The transmission cooler finally arrived, apparently on a slow boat from Arizona. I made a bracket to mount it and hooked the lines to the cooler with a short section of hose that came with the cooler. I added some hangers along the length of the lines for support.
March 14, 2016
Today I crawled under the truck to see how I was going to move the brakes lines to get them away from the headers. Seemed simple but the 50 year old brake line fitting just would not let go. I ended up cutting them off. I plan on getting new brake lines for this anyway. I also noticed that the passenger side rubber hose going to the caliper has some noticeable cracks in it, that will have to be replaced, funny the driver side looks new. Before I go to the auto parts store to get the lines I thought I would drop the transmission oil pan since it seems like that is where my tranny leak is coming from. I can get a new gasket and hopefully fix that issue. But of course that wasnĺt as easy as opening the drain plug and the unbolting the pan. The tranny cross member goes right under the rear pan boltsůwho designed that!!!!!! Maybe this is just another thing the builder of this truck modified since the engine is pushed back several inches from stock, I will investigate that. Getting the cross member unbolted was a pain but getting it out is impossible from what I can see without removing the tranny. You can slide it back some to get to the pan bolts but getting it lined back up looks even more of a challenge. After cleaning up the gasket mating surface of the pan I saw some things I didnĺt like. Summit sells a new pan at a very reasonable price so I ordered one.
March 15, 2016
In order to get the brake lines totally away from the headers I decided to completely reroute them. Right now the rear line runs from the MC, over the inside of the frame where it is very close to the header, then across the front cross member, up on the inside of the passenger side frame rail once again close to the header and hooks to a union. From there it runs along the inside of the frame rail to the rear end. I removed the section that runs across the front cross member completely. I rerouted the section the runs on the inside frame rail so it crosses the truck on the rear cross member above the driveshaft then long the inside of driver side frame rail. Using another union I brought it up to the MC on the outside of the frame keeping it well away from the headers. For the front line I ran a new line from the MC on the outside of the frame rail keeping it away from the header and joined it to the ôteeö that splits the front line to each caliper.
March 16, 2016
Sometimes even a blind hogůůůůůůůůůůůůůů..While looking for a retaining clip that I knew was in the garage somewhere I found some braided stainless brake hoses I had bought for another project that never happened. And as luck would have it they actually fit. Well almost fit. On the driver side there was an adapter on the end of the hard line that was different than what was on the passenger side. I removed the adapter and the hose screwed right on the hard line. In the bag with the hoses were new copper washers and clips! Summit came through with the tranny pan and gasket. With a little maneuvering to support the transmission I was able to install the new pan. I put some fluid in to see if that was really the source of the leak, time will tell.
March 23, 2016
I seem to continue moving in a negative direction with this truck. I have added the tranny cooler and moved the brake lines but today I started taking things off again. I spent much of yesterday trying to get the AC and power steering belts to line up. The GM engineer that designed the mounting bracket for the PS pump must have been on drugs. There are three bolts in the sliding slots you have to loosen and two more that need to be removed to get the pump to move. I have ordered a better bracket! At least it looks better, assuming it works. After many tries I think I got the AC compressor lined up the test will be when the new PS pump bracket gets here. I cleaned up the PS pump and painted it with some semi-gloss black and ordered a new pulley. Since I am attempting to pretty up the engine I have decided to paint it the correct Chevy orange. That is going to be a little tough because I am not removing everything. But since the headers, alternator and PS pump are already off this seems like a good time. Gonna need a lot of tape and aluminum foil! I will be using POR-15 Engine Enamel so I can put it on with a brush, that will make painting around stuff that I am not painting easier.
Today I cleaned up the header mounting surfaces on the heads and pulled off the valve covers. Then I thought I would clean up some engine wiring that looks shaky at best. Shaky is being kind. I found three wires that go nowhere and the main +12v line coming off the alternator to the car was joined with a wire nut. I also found several bare sections of wire simply taped over inside a bundle of wires. I hope I got this all straightened out. I moved the fuel line a little to get the filter off the valve cover.
March 26, 2016
Its engine cleaning and paint prep time. This truck it hard for me to work on because the engine sits so far back and low. I have the wheels off and the truck is as low as I can get it, but it is still hard to reach many spots. The POR-15 instructions say to get it very clean so I hit the whole thing with brake cleaner to get as much oil and grease off as I can. It also said if there is already paint on anything it needs to be scuffed before painting. The black paint the PO had put on came off rather easily but what factory orange there was underneath was not so easy. I tried the best I could to sand it all but was tough. The actual painting had it rough points too. Following the instructions I waited until the first coat was dry to the touch and applied a second coat. It certainly doesnĺt look factory but its orange so Iĺm happy. Now to start putting this thing back together.
March 30, 2016
I Installed the new Z28 valve covers. The base of the air cleaner needs a hole for the valve cover breather hose fitting. While cruising around EBay I found an air cleaner base that has the correct fitting for this. The vendor is Auto Metal Direct which is 3 miles from my house. I went over and picked it up for less than their EBay price. The PCV valve comes off the opposite valve cover and will need connected to a carb base fitting. This carbĺs aluminum spacer on the engine does not have that fitting but I bought a plastic carb spacer with the fitting. Being plastic this will also keep the carb a bit cooler. The AC compressor with its bracket was also installed today. One of the AC hoses is way too long. I will check on how much that would cost to make right. The alternator bracket that was on the truck may be the chromed stock version but it looks ridicules, just huge chunk of chrome on top of the engine that actually interferes with the AC compressor and heater hoses, so its history. I spent a great deal of time searching for a low mount for the alternator but ones that use a short water pump are rare. So I bought one that I thought was right, turned out it mounts on the driver side, thatĺs where my power steering pump is. I gave up the search and modified it using the main portion of the new one, a couple parts from the old mount and making a new support bracket. This is one strong alternator bracket but does require a belt change. Gates 7480 did the trick.
April 6, 2016
The past few days have been a lesson in while Iĺm at it. I am constantly seeing things I donĺt like and things that are just wrong. I noticed a few more wiring issues mainly because the PO never soldered anything. I shortened a few wires, lengthened a few and cover all the engine wiring and the oil pressure line with Painless Power-Braid, this stuff is awesomeů. expensive but awesome. I also shortened both heater hoses to get them the sit better and not interfere with anything else. I mentioned earlier that I moved the fuel line to get the filter off the valve cover. But I still wasnĺt happy with the location. For the relocated fuel lines I used braided hose with AN fittings and a better filter. I also added a pressure regulator which I mounted on the fender well. The lines now come off the pump through a filter and on to the regulator. The output of the regulator runs behind the alternator and up to the carb inlet and a pressure gauge.
April 7, 2016
The nightmare of the power steering bracket is also being replaced with one that makes more sense. The new power steering pump bracket uses the two bottom holes on the front of the block and one of the motor mount bolts to mount it. There are two pieces sandwiched between two long spaces and then bolted to the block. The outside piece uses one bolt hold it to the pump. The back piece uses two bolts to hold it to the pump, one of which is the adjustment bolt. With the new bracket in place and the addition of a few washers to the AC compressor brackets I have the belt aligned pretty well. But finding a belt that will go on the pulleys and allow for enough adjustment to get the belt tight has proven to be difficult. But after three trips to the parts store I found one that works, Gates 7590.
April 9, 2016
I am about to call for help getting the brakes bled and the headers installed. So I thought I would do some perp work first. You know, just to make this go smoother and faster so my buddies arenĺt to inconvenienced. First I checked the brake bleeders for their wrench size to be sure the front and back were the sameůůůů..NOT! Well they sort of are. The driver side and the rear are the same and loosened right up. But the front passenger side is so messed up the 3/8ö wrench just spins. No big deal I will just replace it. But getting it out was damn near impossible. I sprayed it with penetrating oil and tried with vice grips but it would not move. What the hell did the PO put these on with!!!?? After removing even more of the bleederĺs metal with the vice grips I put a 9mm box end on it the using a socket beat the wrench onto the bleeder. That finally worked. Getting the wrench off the bleeder is another story! I had a few new bleeders left over from other projects and had the M10x1.5 x 33mm I needed. I then opened all the bleeders and pumped the brakes until all the new empty lines and the front caliper filled up. Canĺt wait to attempt to install the headers!!
April 12, 2016
Anybody that knows me well knows I hate to ask for help, not a good trait but that is just the way I am. So I decided to reinstall the headers myself, after all I got them out how hard would it be to put them backůůůů. I should have asked for help! I started on the driver side, just to avoid the starter issue. These headers do not have a single flange that bolts to the head, there are three individual ones. One for the front port, one for the two center ports and a third for the rear port. The problem I noticed right off was the one piece gasket did not line up with all the bolt holes, some adjustment will need to take place. Since the instuctions on the Remflex 2011 gasket reccomend triming them to fit I cut the gasket into three pieces for the three sections. With a little maneuvering and the use of my floor jack I got the header into the engine bay from underneath. Using a small screwdriver as a pry bar I was able the get the front and two center bolts started. I then removed the front bolt and slide the gasket in place and installed the front two bolts loosely and repeated that for the center port. This was going well. But the rear port bolts are damn near impossible to get to. I managed to get itĺs front bolt started with the gasket. Thatĺs where it all went bad! The rear bolt can only be accessed from underneath the car and there was no way I could get the bolt to line up with the hole in the head. Seems like that flange was not square to the head. After fighting with this for what seemed like hours I took the whole thing apart and started over, this time starting with that rear most bolt. After a few attempts and getting the bolt and gasket dropped on my face I finally got it started. The rest seemed easy actually easy, gotta remember this in case I have to pull these headers again. The passenger side will have to wait for another dayů..Iĺm tired and I need a beer.
April 13, 2016
Before I start putting the passenger side header back in I thought I would address the starter. The PO never said he had any issues with heat soak but I know Chevys with headers often suffer from this due to the small wire feeding the solenoid. I fixed that in my Z by incorporating Fordĺs starter relay method with a much larger wire feeding the Chevy starter solenoid. I also know high torque starters will also fix this. Because I had to pull the big stock starter to get the headers out and would have to pull the header to get that starter out I went with the much smaller and clockable high torque starter. This is my first attempt at putting an aftermarket starter in a car. I got on YouTube to find out exactly how to tell if I needed the shims that came with the starter. Turns out I had to add the inner shims to adjust the gear engagement depth and one on the block to adjust the teeth mesh depth. Now weĺll see if I can get the header back in without removing the starter, that would be nice.
April 14, 2016
My hopes were realized. The header does go on the passenger side with the high torque starter installed. Getting the head holes to line up was still an issue but not as bad as the driver's side. However getting the headers bolted to the exhaust was not so easy. This side fit much tighter than the driverĺs side. After struggling trying to pull the exhaust back and get the gasket inserted I decided to drop the exhaust, at least loosen the hangers. But the exhaust guy was a little lazy and welded the hangers to the pipe and to the frame, no wiggle room here. I ended up splitting the gasket to get it around the collector and bolted it down. Hopefully there wonĺt be any leaks. When I pulled the headers I noticed the only seal between the header and the exhaust was RTV, not my choice for exhaust seals. The biggest problem was smacking my head on the bottom of the fender and opening a nice cut above my eye, not all that unusual for me! I will now go through my check list to see if I have done everything I need to do to start this puppy up again.
April 19, 2016
It is time to start the truck. I changed the oil and topped off all the other fluids. I dumped a little gas down the carb vents since the truck has been sitting for weeks. I hooked the battery up and turned the key. The engine turned over but would not even attempt to start. Plus the starter was making a horrible screeching when I released the key from the start mode. And if that wasnĺt bad enough I had a gas leak. The gas leak turn out to be simply the filter and become unscrewed during all the test fits, didnĺt even know it would come apart to change the filter inside. While investigating why the engine didnĺt fire I found the +12v to the HEI distributor was gone! No clue why or how or where it is now but it was gone. Apparently it had fallen off during all the rewiring and I must have thought it was just another of the PO ôspareö wires. As I remember it was not a GM connector but simply a spade lugů..figures. I couldnĺt find the correct connector local so ordered one but in the mean time I used a spade lug and ran it to a switched 12V source on the fuse block. I hit the key and the engine roared to life. But now the screeching starter noise is still there after the engine is running. When I changed to the mini-starter I used all the shims that came with it and thought I was good to go. The starter gear does look a bit close to the flexplate so it looks like I need another internal spacer. Of course I canĺt get that local either. I sent an order to Summit since they are semi-local and usually deliver within two days. There is also a coolant leak but I canĺt find where it is coming from yet. So while I wait for all this stuff to arrive I added a few ground straps from the engine to the frame and the frame to the body, there were none on the truck before.
April 20, 2016
Summit came through in one day, gotta love that. I added one set of the new shims inside the starter which backed off the gear .05ö and that fixed the screeching problem. With that out of the way I let the engine run for a while to see if I could find that mystery coolant leak. No leak, thatĺs weird. The only thing I can think of was left over coolant sitting on the cross member and frame that engine vibration dislodgedůweird. But I did have several tranny cooler lines leaking at the fittings. I sort of figured that would happen and they were easy to tighten. The power steering pump fluid was low after reinstalling it so I filled it and burped the system.
April 21, 2016
Houston we have a problem! I ran the truck this morning for almost an hour to get the engine and header paint to cure. All went well, no issues at all. A few hours after shutting it down I tried to start it again. Nope, not going to start. The starter gear would engage the flex plate and just stay there not turning over the engine. Great, that starter didnĺt last long! So I went to the parts store and bought a GM mini starter for over $100. It may be mini but itĺs bigger than the one I had so it was a little tougher to get past the header. But worth it if it workedů.it didnĺt! Same result. I tried shimming it but no difference. Then I reinstalled the high torque one again. What is it they say about insanity ôdoing the same thing over and over and expecting a different outcomeö. But this time I heard the starter gear engage and then there was that click, click, click of a weak battery. I charged the battery for a few hours and the truck fired right up. How did this happen? No clue I guess some investigation will be needed. Looks like maybe I messed up on some of the rewiring I did, but the basics of charging are all there.
April 23, 2016
I still have the dead battery thing looming but today we bled the brakes. After we sorted that out I started the engine and engaged the tranny to make sure the rear brakes actually worked. Hmmm, the tranny did not engage, WTF!!! Looking under the truck I was shocked to see the linkage to the shifter arm had fallen offůůůhow the hell did that happen. I swear this truck hates me, I donĺt think it understands Iĺm trying to make it better! After a little Google search I figured out how it was supposed to go back together and got it working. I donĺt think it was put together correctly before. Oh yeah, the rear brakes work. One thing I have noticed while working on the engine is there are no ground straps anywhere. Given the wire nuts and bare wires I found that does not surprise me. I have installed two from the engine to the frame and one from the engine to the body. I will add more later.
April 26, 2016
I am still a bit concerned about the alternator charging. I start the engine but do not rev it, the battery reads 12.4v. I rev the engine and the battery jumps to 14.54v, its charging. This is normal when the sense wire on the alternator is not connected properly or its too close to the battery voltage to kick start the alternator, not a huge deal. However the ammeter in the gauge cluster is not working at all. But to tell the truth I donĺt know if it ever worked. So I am still a little reluctant to take this thing out for a long trip. But I decided to run it around the block a few times. But when I tried to close the hood it was hitting something and would not close. The only thing it could be is the tranny cooler bracketůůyep I guess I didnĺt think that one through. An hour of fabricating and that is solved, but the road trip will have to wait for another day.
April 27, 2016
Its back on the road! I hooked my multi meter to the battery with leads long enough to sit in the seat. I fired up the truck and as before the battery was sitting right at 12.4v. I revved the engine, the alternator kicked in and the battery went to 14.47v. I monitored the battery while I drove around for a while, it never varied off the 14.47v. Again the ammeter is doing nothing. Iĺm pretty sure that thing is not wired correctly into the wiring harness. But for now Iĺm happy, when I change the gauge cluster I will do more investigating. Right now the only real issue is the steering gear input seal leaking. I watched a few videos on how to change the seal and it didnĺt look too hard until they started talking about adjustments. The gear isnĺt expensive but availability is. Nobody has this thing, not even rockauto.com. I may try to replace the seal if I canĺt find a new gear soon.
April 29, 2016
I thought I had found a vendor with a steering gear but this morning I got a refund saying it was out of stock with no prospect of getting any soon, back to the search. I took a chance and ordered a newer version of this gear hoping it will work. I also ordered a new seal for the steerung gear I have now so if I have to I will attempt to rebuild the old one.
April 30, 2016
I have not tried to figure out why the ammeter is not working. That will have to wait until I install the new gauge cluster. I installed a volt meter and an idiot light below the dash, this is temporary. I have to rev the engine a bit to kick start the alternator but at least I know it is charging. I think I can remove the ammeter and install this voltmeter in its place, or maybe use the unused spot next to the oil pressure gauge, weĺll see.
May 3, 2016
Finally it is time to see how well all this work has gone. A road trip to our Tuesday cruise-in should be a decent test. All was going well until I encountered some traffic. While sitting in traffic the temperature started to climb. It got to 210 and leveled out so I guess thatĺs not so bad. As soon as I started to move it dropped back to 180. I donĺt think the mechanical radiator fan is all that efficient. The trip back home was uneventful. But after sitting all night in the garage I noticed the tranny was still leaking and in an additional place, the speedometer cable fitting. Apparently that is a common issue with TH350 transmissions. Trying to find the parts to fix the leak local proved impossible so I ordered a new part on-line. There was also some evidence of the rear seal leaking too so I got an new one.
May 10, 2016
While I wait for the speedometer cable part to come in I pulled the driveshaft to replace the rear seal only to discover this driveshaft has no room in the slip yoke for movement of the suspension, not good. I also totally failed at trying to get the new rear seal installed so I pulled the extension housing. Of course the first attempt to get the seal in with the housing sitting on the bench worked perfectly. Since the extension was off I reinstalled the driveshaft just to make sure about the slip joint, I was. I measured several time and concluded I need to remove and 1 ╝ö. I took it to my drive line shop to get fixed. One of the things I hate about how this truck is built is the transmission cross member interferes with getting to the rear tranny pan bolts. Cruising the interent I saw a tranny cross member from Southwest Speed that will fix that issue and it was not that expensive so I bought it. I also got an aluminum pan with a reusable rubber seal hoping I will have better luck with this one sealing.
May 20, 2016
I picked up the shortened driveshaft with a new u-joint and test fitted it to be sure it is right before I reinstall the extension housing. It has taken much longer to complete this project because I had a small physical problem but I finally got back under the truck. The driveshaft is in, the new pan and speedometer cable donĺt leak leaving me with hopefully only one more major thing to fix, the steering gear leak. I have two options for this. I can either attempt to install a new front seal in my existing gear or just install a new one which will also involve changing the rag joint. I will attempt fixing the old one first.
May 22, 2016
But before I attempt the steering gear fix I think it is time to move inside to improve the look of the interior. Some of the things I plan on changing in order are a floor shifter, new gauge cluster with a tachometer, some sort of change to the door panels, some electrical work will be necessary since the wiring and fuse block look very scary, headliner, a tilt steering column and new steering wheel, a conversion to bucket seats and a custom console, sound deadener including the rear panel and finally carpet.
May 25, 2016
I pulled the door panels off and removed the silver paint. I will leave the main body of the doors silver but since the seats and carpet will be black I am painting the panels semi-gloss black. I have leftover black paint I used on the AMX hood and will use that hoping for the same finish I ended up with on the AMX. The trim that goes on the top side of the panels was painted silver too so I picked up new chrome ones.
May 28, 2016
I have picked up a new gauge cluster with a tachometer a while back. I swapped out the ammeter for a voltmeter and in the unused location in the cluster I installed a clock. Right now the water temp gauge in the truck is a mechanical one that doesnĺt really fit but the new cluster has an electrical gauge so I will need to swap out the sending unit. The cluster took some fabrication to get the clock and voltmeter installed but it wasnĺt too tough. Not sure when I can get all this installed in the truck.
June 24, 2016
I am a glutton for punishment! Okay, the wiring in this truck is really messed up but still it does seem to work. So why would I buy a complete wiring harness? Good question. Well for one thing I have already decided to put in a new gauge cluster with a voltmeter replacing the ammeter and a clock in the empty spot and most important a tachometer. But instead of using the printed circuit connection I have made my own harness for it that will tie into the new complete wiring harness easily with two eight pin Delphi connectors. The other reason I made doing this is the PO painted everything in sight including every connector and believe it or not the fuse blocků.yeah, the fuse block including the fuses! Plus forty nine year old wiring is never optimal so a complete change was the logical choice.
But before I tackle a complete wiring project I need to address the slow leaking radiator. It has a small leak on the driver side where the tubes meet the tank. While running the truck on long city drives using the AC the water temp creeps up to 230 when sitting stopped in traffic. While that is not a huge temp I am not real happy with that. One thing is obvious, the position of the radiator fan. Because the PO mounted the engine 3 inches back from stock the fan is not inside the fan shroud making it not as efficient as it should be pulling air through the radiator. I got a new bigger radiator to replace the leaky one but I want to fix the fan issue at the same time. I am not a fan, no pun intended, of mechanical fans. I have been running a Ford Taurus fan in my Z for 5 years and am very happy with it. This time I got a dual Taurus fan and will come up with a way to control both fans, probably some aftermarket fan control unit. Getting the Taurus fan to fit in this truck was much more difficult than getting it in the Z. After some trimming some unusable plastic attachment flanges getting it mounted was not a huge problem but sealing it against the radiator was.
June 30, 2016
Work on the Taurus fan continues. I thought the fans were coming with pigtails, I was wrong, the description just said that the fan connectors had male two pin. I thought that meant that was a pigtail, should have asked I guess. Trying to find pigtail for these fans proved difficult. The Ford dealer came through with MOTORCRAFT WPT-1417, but they are very proud of these!!! Anyway I got some aluminum to make seals for the top and bottom of the radiator support. I used some soft rubber door garage seals I bought for another project but never used to seal the sides of the shroud to the tanks. This will help all the grille air come through the radiator.
I also picked up a Derale 16789 dual fan controller. This controller will turn on the first fan at 185 and the second one at 195. But it will not support a Taurus fan so I will use it the turn on two 80A relays that will send +12v to the fans. I made a bracket for all that and mounted it to the passenger side fender well. It is getting a little crowded over there, LOL.
July 9 2016
OMG!!! Sometimes I do things that are just too stupid! I finally got this thing where I can start it again and check out the new cooling system. But as soon as the engine kicked over there was a really loud squeal and some smoke! I jumped out, took a quick look but did not see anything obvious so I shut it down. I looked at all the wiring and tested for anything hotůů..nothing. As depression sunk in I left the garage to think about this before I started tearing things apart. The only thing I changed other than the radiator was the mechanical fan. I took the water pump belt off, started the engine, no squeal. I took the power steering belt off to discover I could not turn the water pump by hand. I actually measured the bolts that would hold the pulley on without the fan and its spacer by testing the depth they would need. But I did not realize the flange they bolted to has through holes so the bolts I used bottomed out on the water pump housing keeping the belt from turning the pump and squealing like a stuck pig! The bolts I used were 1ö long, should have been 5/8ö. Tomorrow I will get new bolts and try this again.
July 10, 2016
The new bolts fixed the water pump pulley problem. This new radiator and the Taurus fan woks great. Running without the AC the temp sits at 180, with the AC it is about the same but still creeps up to 200 in stop and go traffic. I can live with that.
May 24, 2017
After a rather long time I have decided to get back to modifying the truck. I have a list of stuff to do, some of it are fixes but mostly it is modifications. Ever since I got the truck I have wanted to lower it, not to the weeds but lower than it is now. So I picked up some 2.5ö drop front spindles and 3ö rear lowering springs. My concern is tire clearance especially in the rear. If I have clearance I may add some lowering blocks to bring it down a little more. But as usual I immediately ran into a self-induced issue. I ordering the wrong front spindles. I thought I ordered the right ones from Summit but in fact I ordered ones for a 71-72 C10 not a 67. After some conversation on the truck message board I need to take some inventory of what is on the truck now before I head off to Summit for replacements for my mistake. Hopefully there is a part number on the existing spindles.
May 25, 2017
Today I managed to get the old spindles off. Not an easy job for a half blind, broken shoulder 71 year old but it is done. My shoulder is paying the price! Still no clue what they are but Iĺm leaning toward 71-72. One of the upper ball joint boot is trashed so that will have to be addressed.
May 26, 2017
Well I was wrong. I called Moog tech support (800-325-8886) today to get dimensions on the upper ball joint shaft. The difference in the 67 and 71 is the small end of the taper on a 67 upper (6024) is .588 and the 71 (6124) is .551. The big ends are the same .702. So what is on the truck now are 67 parts and stock height spindles from who knows where. One of the upper ball joints already had a torn boot and the rest donĺt look that great so I have decided to go to Summit and exchange the drop spindles for the correct 67 ones and get new 67 upper ball joints. While I wait for parts I will move to the back and see what I can mess up there, LOL.
May 27, 2017
As usual I got off on a tangent at the rear of the truck. My plan today was to at least pull the springs. I did get the shocks removed from the bottom mount and the trac bar pulled off, I will be replacing that with an adjustable one. Lots of rusty bolts but I managed to get them all off without too much effort. Then I decided this was a good time to take off the trailer hitch the PO had installed, this proved to be a major job. The PO had installed this hitch between the truck frame and the new fuel tank. He used bolts and nuts but I could not get to the bolt heads because the fuel tank is in the way. Fortunately I was able to get all the nuts off and drive the bolts free. Some of those bolts will have to fall out of the frame on their own, LOL. But that did not free the hitch. This truck has a rear roll pan which he made a cut in for the hitch. Instead of bolting the roll pan on it is welded on so the hitch would not slide out. I removed one of the fuel tank straps and beat on the hitch sideways to get the passenger side free of the tank. But the driver side was still captured. I tried to remove the other tank strap but once again I could get to the bolt head. I beat on the hitch a lot trying to get it free and all of a sudden it fell out, YAHOO. No clue how that happened! The spring removal will happen on another day, Iĺm tired and need beer!
May 29, 2017
I got some things partially completed today. I installed the new upper ball joints, no issues there. But when I put on the drop spindles I realized the bottom ones were not 1967 but 1972, man I thought I had this figured out! I picked up a correct lower ball joints and installed those. I then connected the tie rods and sway bar with the drop brackets. At this point I decided to get new rotors, calipers and pads since the ones on there now look kind of sketchy. After bleeding the front brakes the modifications to the front will be done. The PO really screwed me this time. I got new rotors for the front but when I tried to put the wheels back on they would not seat. It turns out the PO ground down the hubs to fit the Boss wheels. Why didnĺt he get wheels that would actually fit? This should be fun to fix. I hate to do the same thing, but I am not buying new wheels so I have no option. After some research about this I found several threads about the same issue with Boss 338 wheels and the fix is to grind a taper to the front of the hubs.
May 30, 2017
The C10 message board confirmed what I already knew about freeing the upper bolts on the coil springs. Somehow get a żöwrench on the upper nut inside the frame and a żö socket on the bolt inside the spring and turn it for what seemed like an hour on each side. Fortunately no totally frozen nuts and no rounded off heads. So the springs are out.
The new rear shock re-locators came today. I was a little disappointed to read the instructions telling me I had the remove the rivets holding the top shock mount on. I thought this was a total bolt-on. I will have to borrow an air chisel, never used one of those, this should be interesting.
June 2, 2017
After all the time looking at YouTube videos about removing rivets I went another direction for the rear shock mounts. I could have done it the standard way but the heads of these particular rivets are under the frame and not really in a spot that would be very accessible and I hate working over my head. I ended up grinding down the small end of the rivets flush with the frame and used a punch to drive them out, worked great. I have started cleaning up the frame and cross members for Por-15. I removed the welds and rust that was starting on the bed side walls under that angle rails and a little of the paint above that area. I think I may use bed liner to cover the side walls instead of repainting them.
June 3, 2017
A few days ago I installed the front sway bar but didnĺt notice with the drop spindles the end links hit the tie rod ends so I canĺt turn the wheels. That is not a good thing! After some research I decided to eliminate the spacers on the end links and reinstall the old frame mounts to get the bar to clear the tie rods and make the bars more parallel.
June 5, 2017
I got the front suspension cotter pins in place and installed the hubs and rotors. But I ran into small problem when I attempted to put the calipers back on. It looks like I need to compress the pistons in order to get the pads to clear the rotors. Iĺm thinking a ôCö clamp will work but I want verification on that theory. I then tried to remove the lower shock mount to install the relocators but I don't have the right socket for that so that will have to wait until I get the 1 1/16" impact socket.
June 7, 2017
The old spring retainer caps and bolts were not in the best condition so I got a new kit from Classic Parts. I sanded down the mounting areas for the rear springs and hit it with POR-15. While I was in the area I noticed a leftover, unused exhaust hanger so I used the grind off the rivet and drive it out method to get rid of it. When I looked in the frame to get the rivet head I saw a wad of taped wires. Once again the PO was up to his usual tricks. This time he didnĺt even bother with the wire nuts he simply twisted the wires together and wrapped them with electrical tape. Looks like I have some more wiring to fix, bummer!
June 11, 2017
Kind of a busy weekend with not too much time for truck stuff. I fixed the messed up wiring for the tail lights and added one for the license plate light. Ever since I sprayed penetrating oil to pull the spring retainer bolts I have noticed some liquid on the ground at the end of the right side axel. I thought it was just penetrating oil dripping out of the frame. But now I realize it is brake fluid, dammit. I looks like the fitting is leaking and it seems to be as tight as it is going to get. At least it is the short brake line but I really donĺt need another issue to deal with.
June 12, 2017
I replaced the leaking brake line, crazy thing fell apart when I unscrewed the fitting at the brake. A smart man would take that as a clue and replace them all!
June 20, 2017
I I thought it was time to install the new lowering springs, how hard could that be. I have new springs and retainer kits to put them in, everything I needů.maybe not. While the retainer kit has nuts, bolts, washers and lock washers there is a problem. The top went together without a hitch, but the bottom immediately presented itĺs first problem. I jacked up the diff to raise the tailing arm to meet the spring. Not gonna happen. Since I pulled off the bed there is no weight and the whole truck started to go up, hmmmmm. What do I have that is heavy or am I going to have to call my fattest friend? I sat on the rear corner of the frame and jacked up that trailing arm and the spring met, cool. So I donĺt need that much weight. I put both my rear wheels on the frame and that worked, almost. The kit has washers and lock washers but the washer is too small in my opinion the cover the hole in the trailing arm. I have some big, thick washers that came out of the truck but I think they are for the bed mounts and probably are not grade 8. Plus with those washers and the lock washers the bolt is not long enough to hit the nut on the retainer, gr-r-r-r-r-r. But it is all on, looks like I need a trip to the hardware store before I torque all this for real.
June 21, 2017
I got some slightly longer bolts for the lower spring mount this morning. But the only washers they had for the Żö bolts were in my opinion too small so I made some. Then I put on the rear shocks with the shock relocation kit. Right off the bat we have an issue. The top relocator bracket bolt where the shock mounts must be put in from under the cross member or the shock will hit it. Youĺd think they would mention that in the instructions! After that was fixed the next issue was on the bottom mounting. The shocks were fully extended which meant itĺs bolt hole was below the shock mount hole. I used a jack on the shock to get it lined up. Two issues here. I am not the strongest guy in the world with a bad shoulder and could not compress the shock by hand. I have lowered the rear suspension so I might need new shocks because of that. Weĺll see if there are any issues once weĺ back on the road. The last part to go in is the panhard bar. I bought an adjustable one, just because I like adjustability. But It wonĺt slide into the bracket on the frame. Weird thing, the one I took out wonĺt go back in neither. There must be a trick the this, I will try again when I am not so tired.
June 22, 2017
I managed to get the panhard bar on but it was a battle. And just to complicate things it hits on the exhaust pipe and is very close to the fins on the diff cover, some adjustments will be needed.
June 25, 2017
As fate would have it I was thinking I should probably change the other rear brake line since I had that weird failure on the passenger side. Sure enough I barely bumped the longer line this morning and it started leak right at the fitting exactly like the passenger side did.
June 26, 2017
Why canĺt this truck let me do what I intend to do? My plan was to lower the truck and refinish the bed floor. But it has gone way past that. Just when I think I have turned a corner something unforeseen pops up, like the brake lines. Okay, I replaced the short passenger side hard line and now the driver side started leaking too, what the hell is going on here! Everything up front was upgraded last year but nothing in the rear. So I figured I probably should replace the hose in the rear as well. But trying to get it to disconnect the main line fitting came apart just as the other two had. I think whoever put these on over tightened everything. The only thing salvageable is the tee fitting! So its off the the parts store to get a new hose and two brake lines. I got all the parts I needed to fix the brake line issue and installed them. This time I used the clamps on the rear axle to hold down the brake lines, something the PO did not do. Makes me wonder how much vibration occurred that may have weaken the fitting at the drums.
July 8, 2017
When I install the new adjustable panhard bar I noticed it was very close to the diff cover. It is 1 1/4ö while the stock one is only 5/8ö. Now that I dropped the truck down on its wheels the bar is touching. I took it off and ground down the top of the fins but now it is touching the body of the cover. Apparently the cover is taller than a stock one. I was hoping the bar was solid so I could machine it down to clear but it is hollow with welded on bungs for the adjusters. I put the stock one back on for now.
July 10, 2017
Research, the answer to not buying the wrong part is research. I know this but keep making the same mistakes. This time it is the panhard bar. When a vender produces and advertises a part they should bring up things like this will not fit if using an aftermarket diff cover. The message board brought this to my attention and told me about a bar that will work and actually has better geometry. This one hooks to the stock frame mount and then to the bottom of the opposite trailing arm with a custom bracket. Of course it cost over twice as much but it is on sale right now so at least I save $13.
July 19, 2017
The panhard bar arrived so I changed gears and installed it. This thing is a beast for sure and I think it will do a better job than the one in the stock location. Pulling off both axel u-bolts was a little scary but I got it done. I have a couple small complaints about this bar. I wish they had adjustors on both ends to make the bar adjustable without removing it from its mounts. It took me several tries to get it centered. And the hole for the nut and bolt that holds the bar to the trailing arm bracket is too close to the bracket to get a socket on, trying the get any torque with two open ends is a pain.
July 25, 2017
From what I have read I really need to get new rear shocks since I lowered the truck. Adding another inch of lowering made me to order some new ones. I got some Belltech Street Performance shocks 2208AA to replace the stock ones.
August 7, 2017
Some good news today, I sold the adjustable panard bar that didn't work with my setup. So I did get 90% of my money back!
August 16, 2017
After weeks of body work on the bed and dealing with brake lines and panhard bars I decided to take this thing out of the garage to see if I messed anything else up! I still have no bed on the truck. I couldnĺt take it out for a long drive with no tail lights or license plate so I made a couple trips around the block. To my surprise nothing is making weird noises and the steering seems the same as it did before the spindle swap, cool. Of course there is still the question as to whether the lowered truck will clear my rear tires.
February 23, 2018
Now that the bed is done I am going to fix the totally messed up paint job the PO did to the inside of the hood. I managed to get the hood off by myself. Then I removed all the paint mostly using a razor blade tool and sandpaper to get to bare metal. Unfortunately there is one area the PO fixed with his welder. He didnĺt grind off the welds, looks like he simply added body filler to the outside and didnĺt address the underside. I donĺt want to repaint the outside so I will have to live with this. I have debated on how to paint this. It was all body color before which I think is stock but I decided to paint the frame part body color and the hood sheet metal semi-gloss black. I shot the entire underside with urethane etching primer. Then taped off the sheet metal areas and shot the silver and clear.
February 24, 2018
After sitting overnight to get it good and dry I taped off the silver and shot semi-gloss black. Other than the messed up POĺs bodywork it looks pretty nice. Now to find two guys to help me get this thing back on the truck.
February 26, 2018
The cushions between the hood sheet metal and the inside frame supports were hard and not doing their job causing the hood sheet metal vibrated badly while driving. I got some new ones but getting them under the braces was not easy. I finally managed to get them in place but in the center they donĺt fit tight. I used some 1/16ö single sided tape to stick to the cushions in the low spots and with a lot of pushing and pulling I finally got them wedged in. I will have wait until I get the hood back on to see if these fix the issue.
February 27, 2018
The front of the truck including the headlight bezels and grille trim were painted body color by the PO. It looks okay but that is a lot of unbroken silver. I thought about painting the bezels and grille trim black but that would make the grille trim disappear into the grill opening. I got some used polished aluminum headlight bezels and am scouting for reasonably priced grill trim, these are crazy expensive.
March 4, 2018
I waited a while before putting the hood back on to be sure the paint had fully cured. With help of my neighbor and his two brothers, hey he asked if I needed help, I got the hood back on. As usual alignment took a couple of tries but it is finally on. I took it out for a hood vibration test. The cushions did their job. With this job done I will move on to something else.
March 6, 2018
That something else tuned out to be the front of the truck. Everything including the headlight bezels and grille trim were painted body color by the PO. It looks okay but that is a lot of unbroken silver. I thought about painting the bezels and grille trim black but that would make the grille trim disappear into the grill opening. I got some used polished aluminum headlight bezels. I searched for quite a while for new surrounds and finally found Parts Geek had the best price. However after a week of Parts Geek failing to ship parts they said they had only one but to then finally said they were totally out of stock, write another supplier off the list. I ordered two aluminum grille surrounds with clips from LMC.
March 9, 2018
Getting the complete grille frame off the truck was not as bad as I thought it would be. The surrounds were held on with a flat piece of steel with the threaded stud welded to it. I simply removed the nuts to get the old surrounds off.
March 16, 2018
The new surrounds came in today. The new surrounds use clip assemblies consisting of a weird spring, stud and nut to hold the surrounds to the grille. Who the hell came up with this idea, these are a total nightmare to install!!!!! I was hoping the old fasteners would work on the new surrounds but they wonĺt. I got all the clips installed on the surrounds, whether the line up with the holes is questionable.
March 17, 2018
Getting 14 clips on each surround to line up is trial and error but I finally got the surrounds on after a few tries. I positioned the grille on the truck but could only get it mounted to the hood latch and one top fender bolt in each side before I ran out of energy. Hopefully I can finish this tomorrow.
March 18, 2018
After a good nightĺs sleep I went out to the garage early to see if I could finish putting this front end back together. The first job was getting the other two grille to fender top and bottom bolts in. That went pretty smoothly. After that I reinstalled the radiator defector and the roll pan. That did not go smoothly. The pan is sandwitched between the grille and the radiator deflector and getting those to line up was a bitch. Then for some reason the hood latch bracket was not going in correctly. I screwed around with this for about an hour and suddenly it just went inůno clue. Inside the transmission cooler mounting bolts went in and I called victory. What took about an hour to take apart took five and a half hours to put back together! On to the next project.
March 26, 2018
The PO had installed what look like period correct round sport mirrors on the doors. But in reality these are almost useless. I think he mounted them too far forward and viewing is partially obstructed by the vent windows. This truck is a small rear window model so rear visibility is limited already and these mirrors do not help. I found some black rectangular sport mirrors that were advertised for of all things a Datsun. The price was decent although they would be shipped from Thailand. I took a little 13 days to arrive, better than some on-line USA based vendors, and they are really good quality. Mounting was much easier than the stock sport mirrors and since the base was longer I was able to move them rearward a bit.
March 29, 2018
After all this work I am still not happy with the stance. The front is fine but the rear is still too high, with too much rake. I put a level under the rocker panel and it looks like another inch drop will work. The cheapest way to get another inch is lowering blocks but I really donĺt like the idea of using blocks. I fought off the cheap theory and went for some Belltech 4ö lowering springs. Actually it is easier to change the rear springs than to install lowering blocks. Yeah, that looks better.
April 11, 2018
It is weird when dÚjÓ vu hits. Way back in the day my 1965 Sunbeam tiger had a mechanical oil pressure gauge. Two days in a row I noticed a spot on my pants leg that turned out to be oil from a leaking pressure gauge. About a week ago I noticed some spots on the left side of my truckĺs console and then last night I saw what was obviously oil on my shoe and the gas pedal, yep mechanical oil pressure gaugeů..AGAIN. I am changing the entire gauge cluster to more modern setup up anyway and this one has an electric oil pressure gauge. But as typical on the truck Chevy put the oil sending port in the most inconvenient spot possible. It is beside and under the distributor with the carb linkage on the way. Some disassembly required!
April 12, 2018
I ended up having to disconnect all the carb and kick down linkage, pull the plug wires and distributor cap just to get to the fittingůůcrazy. Unscrewing the copper line was easy but getting the fitting out of the block took some effort. Then of course the new sending unit is too big to just screw in, it hits a boss on the intake. I got a straight male fitting and a right angle one to screw onto that. That gave me the room I need to install this monster sending unit.
May 20, 2018
I am still having belt alignment issues, I hate v-belt systems. I finally bit the bullet and have ordered a serpentine system. Yeah, I know you can use a system of stock Chevy engines but I didnĺt feel like attempting to find all that stuff just to have it not work. But I also donĺt want a mega-dollar system you see on high dollar show cars. I ended up choosing a system from CVF Racing. It includes all the brackets, pulleys and belts that will allow me to use my existing accessories. I upped a few bucks to get them in black. Hopefully this will work with no major issues.
May 23, 2018
Anyone that ever built or modified a car or truck knows how this works. One project leads to another just because you can. A while back the truck threw a radiator hose and spewed antifreeze over everything. I was able to remove most of it but the aluminum valve cover were stained and nothing I could think of would remove the stains. While I wait for the serpentine kit to arrive I pulled the valve covers off, sanded the stains out with progressively finer gritsů.120, 500, 600, 800 and finally 1500. Then I polished them. To add a little bling I taped off the main bodies and shot some Chevy orange into the fin area, After that dried I sanded off the tops of the fins.
May 24, 2018
Let's tear this truck apart...again. I took off the power steering pump, alternator and their associated brackets. I swung the AC compressor off to the side without removing the hoses to keep its Freon. Then I removed all the grove pulleys. The water pump is a no brainer, four bolts and it fell off. The crank pulley was also easy, in fact one of the three bolts was not even tight! The power steering pump took an impact wrench and a gear puller as did the alternator. The AC compressor was a challenge since I have never taken one of these apart. Thankfully YouTube came through with a good video on the Sanden pulley removal. I used the impact wrench to remove the nut, a homemade steering wheel puller to remove the clutch, then after removing the snap ring for the pulley I used a gear puller to take off the pulley. However when the kit arrived there is no pulley for the AC compressor, guess I didnĺt read the fine print. I did find one for $35 delivered, hope it goes on as easily as the old one came off.
May 25, 2018
I had a little time today to start the serpentine system install. As usual I immediately ran problems. The holes in the harmonic balancer need cleaning or tapping to get the longer supplied bolts to seat. Fortunately I have a tap for those bolts and got the crank pulley installed. The water pump was next. I had measured it and instead of the pulley mount being 7ö from the block it was 6 7/8ö. WHY!!!!!!! I made a 1/8ö spacer and installed the water pump pulley. Two pulleys, two issues, I am not getting a warm fuzzy feeling.
May 26, 2018
Today I went at the alternator. But of course there were issues. The bracket fit the alternator and would bolt right up to the water pump and head. Great, I was thinking this is going to work smoothly. But after I mounted the bracket the alternator would not fit. It was hitting the stock lower radiator hose and my braided fuel line. I pulled off the radiator hose, re-clocked the fuel line fitting at the fuel pump and moved the fuel pressure regulator up a little higher on the fender well to remove some stress on the hose. That worked and the alternator went on. However I see no way to get the stock radiator hose back on the water pump, going to have to get creative I guess.
May 27, 2018
Another day another bracket. Man, I thought this was going to be a two hour job!!! Today it is the messy job of the power steering pump. Messy because no matter how much you try you just canĺt get all the fluid out of the pump. Anyway the instructions for this one suck! Blurry pictures and not any instructions on which of the several pump holes this bracket actually are used. Eventually I figured it out after realizing you donĺt want to put the pulley on until the pump is mounted. I bolted the front bracket on positioned the rear bracket with the long spacers and bolted it to the engine block. Not that easy because holding all this together while trying to see the mounting holes in the block is a bitch. I tightened everything and put the pulley back on only to realize I canĺt get to the high pressure fitting so I pulled it all back off. I put both of the hoses on and attached the whole thing back on the engine.
After a lunch break I decided to see how much trouble I could get into with the AC compressor bracket. There were two issues, one small, one major. There is a temp sending unit on the intake that interferes with the new compressor home. Not a big deal it is for the temp light so I can live without it for now. The major issue is the compressor hoses. They both have a greater than ninety degree bends and ideally they should now be ninety degrees. I got a plug for the temp sender but am waiting for the serpentine pulley for the AC compressor. I also need to figure out a solution for the radiator hoses.
May 31, 2018
The serpentine pulley for the AC compressor arrived today. I looked at the video about how to install this thing again just to be sure I knew what I was doing. My first attempt with the compressor mounted was a total failure, just not enough room the smack it on. So I pulled the compressor again leaving the hoses on and sat it upright on the radiator support. That worked and I was able to seat it past the snap ring grove. Then I put the clutch back on making sure I had the .060ö clearance the video said I needed. Hopefully the compressor will still work!!!!!!!!!!
June 5, 2018
But of course there is an issue. The PS pump pulley seems to be out of line. Man, this is one of the reasons I got a new accessory system and the problem is still there!!! Iĺm so confused!!!!! The idler pulley and the AC compressor line up with the inside crank pulley but not the PS pump, weird. The PS is about ╝ö too far forward which is exactly the way the v-belt system was. Something is weird about this truck. I used shims to move the pump back in an attempt to get it lined up but the reservoir hits the head. As it turns out I put the old Alan Grove PS v-belt bracket which I found out was for a short neck water pump back on and the pump lined up, very weird. The belt that came with the new system will go on with the AC compressor as close to the valve cover as it will go without touching and PS pump pushed to its maximum short setting but it is tough to get it on. The belt I have is 58.07ö and I need just a little more length. I ordered a Gates K080585 which will give me about .93ö more, that should be good.
June 8, 2018
Mainly to keep the bracket symmetry but also for a little more support for the PS pump I slightly modified the new bracket and bolted it to a boss on the water pump. This seemed like an easy task but turned out to be quite a lot of modification to the bracket.
June 20, 2018
Because of a slight medical issue this project was put on hold for a few weeks. But I am finally back at it.
I just can not get the metal radiator hose failure that trashed the engine bay out of my mind so that needs to change. For the upper hose I picked up two right angle 1.5ö silicone hoses. I attached one to the thermostat housing and the other to the radiator. I joined them with a 6ö aluminum tube.
But a replacement for the lower hose is more complicated. The stock hose hits the alternator because of its new mounting position. The compound angles to get from the water pump, clear the alternator and the frame and turn forward to the radiator is a bitch!
After many attempts at this I finally found a solution. I attached a short piece of silicone hose to the water pump coupled it to a 90 degree silicon hose turned toward the front of the truck. This allowed the hose to run under the alternator with adequate clearance. I coupled another 90 degree silicone hose that hose and positioned it toward the lower radiator connection. I coupled yet another 90 degree silicone hose to make the connection to the radiator. Lots of hoses, couplers and clamps but it all came out very clean.
With this nightmare installation of ôbolt-onö parts over I can move to another project. Hopefully one that will not create as many headaches as this one did.
July 1, 2018
Quick, or so I thought, project was R&M Specialties spark plug wire looms to neaten up the wires and keep them off the exhaust. But of course as with everything I try on this truck there is interference. On the passenger side the firewall indent is a little too small for the loom to clear. I made an adapter which moves the loom holes for the valve cover bolts about one inch to the front. This gave me the clearance I needed.
July 6, 2018
I have way too much stuff I have bought for this truck still sitting waiting to be installed. One of these is a new exhaust. The headers sit too low, well below the frame. They were starting to rust when I got the truck and the high temp paint I applied has not held up, I knew that would not work! Plus getting the collector to exhaust pipe connection to stop leaking has just reached the breaking point. So it is time for them to go. I picked up a set of straight down Rams Horn black ceramic coated exhaust manifolds.
The plan is to install the manifolds using Remflex Exhaust Gaskets and couple them to the existing pipes and mufflers. In the rear I plan on modifying the tail pipes that dumped behind the wheels to exit out the back under or through the roll pan with some cool tips.
July 7, 2018
So today I dove into this project. I disconnected the headers from the exhaust pipes. Then disconnected and swung the plug wire looms out of the way, pulled the plugs and the header head bolts, not as easy as youĺd think. One bolt took a box end wrench and another took an open end moving about ╝ turn at a time from under the truck. Have I mentioned how much I hate headers?!!!!! But after jacking the truck up another few inches both headers fell out the bottom, cool. I cleaned up the mounting surfaces and chased the bolt holes
July 8, 2018
Manifold installation is the plan for today. I have the bolts, gaskets, flanges and the down pipes so it should go smoothly. I used some studs in the two outside bolt holes to position the gaskets and manifolds and then started the actual bolts. The only issue I had was the two center bolts that came with the kit I bought really werenĺt long enough to suit me. I used 3ö bolts instead of the 2 ż ones. I will say putting the spark plugs back in was much easier then fighting with the headers.
July 9, 2018
A week ago I added some spark plug looms to the engine. Other than one of the plug wires being too short to look good I was totally satisfied with all the work it took to get these installedůůůuntil I took the headers off and installed the rams horn manifolds. The plug wires that were on the truck have angled plug ends, these hit the rams horn manifold. I need straight wires and some of them need to be longer. So I optioned for MSD cut to length Super Conductors. These are 8.5mm and the kit comes with several distributor or HEI connection, boot options and a crimper. It took me a while to figure out the options I needed and the get all eight wires cut to length and the connectors crimped on and boots installed. Then I realized that the 8.5mm wire are too big to fit in the loom plastic clamps. No big deal, I screwed each one together and clamped them in my drill press vise and used a .033ö drill bit to make the holes bigger.
July 12, 2018
I decided to clean up some stuff under the truck. I had spotted a cut off bracket on the frame just back of the front fender well. Turns out that was a transmission cross member for a manual three speed. Odds are this truck was a six cylinder three speed when it was built. Naturally I could not just leave the cut off bracket there. What a nightmare! There is no way to get to the tops of the two rivets holding it on. Plus I could not get a drill or my angle grinder on the bottom of them to make using an air hammer easier either. So I attacked the bottom of the rivets with the air hammer anyway. It took better than an hour but I got the bracket out, yahoo.
July 21, 2018
Since I am changing all of the exhaust in the front of the truck it seemed like the perfect time to refinish the bottom of the floor and the frame with POR-15 gloss black. I cleaned everything the best I could, ground down the patch panel welds the PO had done and added some seam sealer around them. Taking the cab off and putting it on a rotisserie would be nice but that just is not going to happen. Doing this on a built vehicle without a lift is a total PITA. Basically you are lying on your back doing all this. To paint the POR-15 with a brush I wore long pants, a long sleeve shirt and gloves. But the paint runs down the brush, drips everywhere and I was constantly putting my arms and legs into the drips. Cloth clothing is useless, the POR-15 soaks right through. If you donĺt get this stuff off your skin within an hour it will just have to wear off with time. It took me almost a week to complete the job. Granted I only worked for a few hours a day since my old body just didnĺt like the positions I was putting myself in. My neck and shoulder took a beating for sure. But it is all done, now to find a custom muffler shop.
July 25, 2018
Now that the exhaust manifolds, plug wire looms and the new coolant hoses are installed the next thing I wanted to do is fix the bogus way the PO had the heater hoses plumbed. The Vintage Air heater hoses exit the firewall with straight tubes. The PO owner connecter the heater control valve simply hanging on the hose about six inches from the firewall then plumbed its input to the intake manifold. According the VAĺs instructions he used the wrong tube but I donĺt think it really matters. I made a bracket for the control valve and attached it to the firewall. I used a short 90 angle hose to plumb it to the bottom heater inlet tube and a longer 90 degree hose to plumb the valveĺs input to the intake manifold. Another long 90 degree hose plumbs the heater outlet tube to the water plump.
July 30, 2018
After the header to exhaust manifold conversion, spark plug wire and loom change and painting the complete cab bottom I need to see if this thing will start again. I need to get it out of the garage so I can clean the floor from the POR-15 mess. I only have short exhaust down pipes just to clear the starter and the oil filter. OMG in an enclosed garage thing is crazy loud! Using my angle grinder and a sanding disc I got all the POR-15 residue off the garage floor.
August 15, 2018
Work on the truck has come to a temporary stand still while I address a few non-automotive things. One of which was really cleaning out the garage and taking a ton of crap to the dump. I painted the walls and changed out some dead fluorescent shop lights for LEDs, awesome.
I got some straight short 2.5ö down pipes that come off the exhaust manifolds. Now I need to get pipes connected to those that will angle past the starter on the passenger side and the oil filter on the driver side and then head toward the rear axle. I had planned to use the existing pipes that go over the rear axle and exit just behind the rear tire. But I want to change the exit to come straight out the back. The existing pipes are 2.25ö so I have decided to change all that stuff for new, I may keep the mufflers, they are in good shape I and I like the sound. The other thing I want to do is run the pipes through the center cross member rather than going under it. This will involve either cutting 4ö holes in each side and welding enforcements or buying a new CPP cross member with the holes already there. The new one also has repositioned mounts for the trailing arms to make the pinion angle better on lowered trucks. Getting the old cross member out looks like a PITA but given all the benefits of the new CPP cross member I am going with that and ordered it from Summit.
August 23, 2018
In preparation for the new cross member I started taking the old one out. First I had to remove the e-brake cable. Once I figured out how GM installs this it was easy. Next the drive shaft had to go. Note to self, have a tranny plug ready! I then supported the rear end and attempted to remove the bolts holding the trailing arms to the cross member. They should be torqued to 140 lb. ft. but Iĺm old with a bad shoulder and even with my cheap air gun I could not break them loose. I hit them with some penetrating oil and let that soak for a while. The penetrating oil worked on one nut. I then thought of my big-ass torque wrench and with a little more penetrating oil the other nut came loose. The bolts came out without incident. Now on to getting the bolts and rivets on the cross member out. I donĺt know how the bottom of the cross member was attached at GM but I am pretty sure they did not use three socket bolts on each side. These thing were torqued to hell and it took penetrating oil, a breaker bar with an addition length of pipe to break them free. One bolt was badly bent and took some ingenuity with a saws-all, vice grips, crowbar and an air hammer to get it out. I still have the rivets on the top frame to get out. I canĺt really get to the rivetĺs heads with the cab on so I will grind the bottoms off the hopefully get the air hammer in there to drive them out.
August 24, 2018
Why did I not buy a lift for this garage?????? After yesterdayĺs lying on my back, rusty bolt day in hell I am very sore. But this project will not finish itself. The new cross member is supposed to be delivered from Summit today so I need to get this old one out so I can slap on some POR-15 the truck before installing the new one.
So I donĺt disturb the neighborhood with compressor, air hammer and grinding noises I got up early this morning and slapped some POR-15 on the drive shaft.
Well that was a fun 6 hoursůNOT. Getting those top rivets off the frame was a real nightmare. I could get the rivets cut off but getting the rear ones punched out of the frame was not easy at all. Then I was thinking I could just knock the cross member forward and cock it a little and it would come out. NOPE! There are two more rivets in the way, fortunately on the bottom. I got those rivets out and started beating on this thing but the passenger side was still hung up on the remains of the upper rear rivet. Using a wedge chisel I was able to free it up and got the cross member out. I then punched out the rear upper rivet remains. I said I was afraid it would be a PITA and it was! Tomorrow I will clean all this up and slap some POR-15 on the chassis. I sure hope this new cross member goes in easier than this one came out.
August 25, 2018
After the cross member came out I noticed a few things I need to address. When I installed the new seats I couldnĺt easily get to the inside bolts for the drivers bucket seat since the cross member made it tough to get the nuts started, I fixed that. The rear bottom of the cab rear sheet metal is showing some surface rust, PO did a real crappy job painting this truck. I sanded the rust off the sheet metal and the frame and slapped on some POR-15, what a mess!
August 27, 2018
Now that the POR-15 has dried I attempted to install the new cross member. But before I do that I want to make sure the new exhaust has places for hangers to be attached. The old setup have brackets welded to the cross member, I do not want to do that. There are a couple unused nuts welded to the bottom of the cab. I used those to attach a piece on 1ö angle that I can either bolt or weld on exhaust hangers. With that finished I went at the cross member. Damn that thing is heavy! You need to put it in on an angle and then slide it rearward until the 14 bolt holes line up. One thing I did not think about was the frame distorting because of the jack stands. This caused alignment issues with the cross member mounting holes. I eventually figured that out and got it installed. The trailing arms were tough to get lined up too but I finally got those in. I still need to torque everything and get the driveshaft and e-brake cable back in. Then I need an exhaust wizard.
August 28, 2018
I got the cross member bolts and the new trailing arm bolts torqued, the trailing arm bolts at 140 lb. ft. were tough. I then touched up places that got scratched during the cross member install.
August 30, 2018
I put the drive shaft back in and started to hook up the e-brake cable. When I pulled the cable out I noticed it was riding on the edge of the holes in the cross member. I assume over time will damage the cable. A little research revealed a couple missing parts the PO left out. There are supposed to be some eye-bolt looking things attached to the frame that align the cable with the holes in the cross member. I tried to use some stainless eye-bolts to do this but then the cable was too short. Looks like I need a little longer cable to fix this.
September 3, 2018
Part of the plan for the new exhaust is to bring the outlets out the rear of the truck. I like the Dodge trucks look of having the pipes set up a little into the bumper, so that is what I am going to do. I picked up another rear roll pan just in case I totally mess this up I can go back to my old one. I positioned a pipe to give me a reference for the cut out in the roll pan, screwed on the roll pan and made some center marks. I then used a 3ö pipe for the cutout size and made the cuts and trimmed them to give me some clearance for the tips. The exhaust tips will be 3ö.
September 7, 2018
It is time to cut some holes. My first thought was to only have half the pipes up into the roll pan like Dodge does. But because the pan is rolled that looked kind of lame. I have room to move them up so thatĺs what I did. I measured a lot, made templates and just went for it. They came out pretty good. Trying to get both sides identical was tough but Iĺm close enough. I will not paint this thing until the exhaust is on, just in case I have to ôadjustö. I am contemplating making trim rings to go around the exhaust tips, we will see how it all comes out before I try that.
September 12, 2018
I have put this off way too long but finally I think I have done all I can to prepare for this new exhaust. I have swapped out the truckĺs center cross member for one with exhaust pie cutouts, made holes in the rear roll pan for the exhaust to exit, bought short downpipes, some removable connections, mufflers, hangers, black 3ö and exhaust tips. All I need now is some 2.5ö pipe and an expert to weld all this together.
September 13, 2018
I called a welder, fabricator that specializes in custom exhausts and this morning he came over to check out what I want done. I have seen some of his work and it is really nice, the kid can weld. He will make it using all mandrel bent in either mild steel or stainless. The price difference isnĺt that much so I will go stainless. He is building a new shop pretty close to me, unfortunately it wonĺt be ready for a couple weeks. Not a big deal I have been at this for months now!
September 15, 2018
After working almost every day on the truck for the past few months you would think this delay in getting the exhaust done would be welcome. If you thought that you donĺt know me! I still have a lot of stuff I have been meaning to put on the truck. One project I have put off for months is the tailgate latch and hinges. I donĺt like the chains that are traditional on the step sides and have eliminated them. I picked up some hinges from K-MAR and a set of Stealth Tailgate Latches from PERFORMANCE ONLINE . This involved some cutting and drilling on the tailgate, kind of scary. I followed the K-Mar directions and after a few adjustments to align the tailgate it all worked.
September 16, 2018
The Stealth Tailgate Latches was even tougher to get the courage to do. First you have to drill a 5/8ö hole in each end of the top rail and 3/16ö holes in the front of the rail to secure the latch assembly. The hardest part was the 3/16ö x 1ö slots for the latch knobs to operate. The stainless knobs that attach to the latch assemblies through these slots allow the spring loaded assemblies to engage the bedsides. You close the tailgate, release the assemblies which leave marks in the bedsides for the 7/16ö holes where the latches will engage. All in all this system is pretty cool. All that cutting and drilling made a bit of a mess on the tailgate. I cleaned up all the bare metal and shot it with POR-15.
September 20, 2018
Tiny little progress on the exhaust. Drake, the welder not the singer, called last night to give me a time frame of when he thinks he can start the project. He came over this morning with my welded down pipes and the rear hanger brackets. I installed them so I am ready to take the truck over to his new shop. Hopefully his contractors will have it ready soon.
September 21, 2018
Since the driver side exhaust pipe will be running under the fuel fill neck and hose I made a heat shield for that area. I donĺt think it is really necessary but it wonĺt hurt to have a little protection from the heat. I used some steel corrugated truck floor and some Thermo Tec adhesive backed heat shield. Even though I have a high torque starter I will also wrap the pipe on the passenger side near the starter to protect it from the infamous Chevy heat soak.
October 30, 2018
Meanwhile back to the exhaust project. Drake and I had a communication problem but that is all straightened out. The stainless exhaust kit I ordered from Summit came in today. Drakeĺs shop is still not done so he will bring all his stuff over and do the fabrication in my garage.
November 1, 2018
Drake brought all his fabrication stuff over today to get this project started. The first thing we attacked was the down pipe on the driver side and itĺs routing around the oil filter. It took him a while to figure how it would attach to the manifold flange and then align with the pipe running along the inside of the frame. He cut 2 ╝ö off the 90 degree pipe, tacked it to the manifold on an angle, pulled it out, made a wedge piece to fit between the pipe and the manifold flange and welded it all together. It worked perfectly. We repeated that process on the passenger side. I think the hardest part is done. Day one is done, we will go at the rest tomorrow.
November 2, 2018
Day two in exhaust world. The plan today is to get the mufflers and the connection to the mid-pipes done. We started on the driver side. We positioned the muffler below the bed and secured it using ratchet straps. Then Drake modified two 90 degree pipes into a ôSö pipe to turn down and then forward to meet the mid-pipe we installed yesterday. We hooked these two pipes together with an exhaust flange to make it easy to remove the front pipe if necessary. Drake tacked all this together and we pulled it out. Drake made a second copy for the other side. It came out great and fit perfectly. It really looks awesome. We are now down to the tail pipes.
November 4, 2018
Day 3 of exhaust hell. Drake came back this morning to hopefully finish fabrication on this project. All we have left is the pipes over the rear axle and the tail pipes. Hoping we would finish was just that hoping. While it seemed like it would be easy we just could not come up with a plan to get the pipes over the rear axle, too many compound angles to figure out with the pre-bent kit we had. When we finally decided to ôjust go for itö and it finally all came together. However we still need to get from the rear axle to the back.
November 12, 2018
Day 4, this took a while. Drakeĺs real job took him away for a week. We only had a few hours to work tonight so we only got the s-bend on the driver side that connects the pipe that goes over the axle to align with the cut out I made in the rear roll pan, installed the black exhaust tip and the rear hanger.
Novenber 13. 2018
Day 5 and the end of fabrication. We got the passenger side tailpipe, extension and the rear hanger done. I made some hangers for the rear of the mufflers. Then the big questionů.will it all come out? We had a couple issues, mainly the tac welds on the back of the mufflers proved difficult to break loose. But we finally got them cut and the whole thing came out as designed. Sitting on the garage floor it looks like a shiny bunch of snakes, awesome.
November 15, 2018
Day 6 but we only have a few hours to work tonight. Yesterday I got all the exhaust hanger brackets partially painted with POR-15. When Drake arrived he finished the welding the hangers to the two muffler hanger brackets and I finished painting them and got them installed. The rear brackets will have to wait until we get the pipes installed. Then Drake did final welding on the driver side pipes before we had to call it a night.
November 16, 2018
Day 7. Drake got the passenger side pipes final welding completed. We painted all the welded areas as a rust preventive. All that is left to do is installation!!!!!
November 17, 2018
Day 8. The task for today is put everything back on the truck. The three pieces per side went back in just as planned. We did have to add one more exhaust hanger at the rear turn out to stabilize the back section better. After what seems like an eternity the truck finally fired up and the exhaust sounds awesome. Not being able to see any of the exhaust unless you get under the truck is great but this stuff looks so cool itĺs too bad people wonĺt be able to easily see it.
December 9, 2018
I had the truck outside the garage all day while I did some painting. When I pulled it back in I notice a bunch of leaves and pine needles had found their way under the cowl vent slots. I picked up a set of black cowl leaf guards to help prevent this in the future. While I have the cowl off I decided to eliminate the antenna optioning for a ôhidden antennaö like I did on the AMX. I patched the holes in the cowl and started body work. I also patched the hole in the inner cowl where the antenna cable passed through, from the looks of it that was a butcher job by the previous owner. I cleaned up and painted the bottom of the cowl and the top of the inner area with black POR-15 the best I could. Man I am a glutton for punishment. Time to get the paint gun out again.
December 11, 2018
I finished body work, getting the 26 slots and the wiper arm holes scuffed enough for new paint was not easy. I need a media blaster!! It has finally stopped raining so tomorrow I will pull the truck out of the garage and get this thing painted.
December 12, 2018
With the truck out and the garage, swept clean and heated to 65-75 degrees I painted the cowl. First with primer followed by three coats of base silver and then three coats of clear. I will let the cowl ôcookö for a few days and then reinstall it with the leaf guard underneath. While I had the cowl off I adjusted the right side fender that was too close to the hood causing the hood paint to chip. Instead of just using all shims the PO had used some washers in addition to just one shim on each of the rear mounting bolts. This would have been fine if he had run the bolts through the washers but he didnĺt and it looks like they shifted some. I fixed that.
December 15, 2018
I scored a set of POL rear tubular trailing arms off the 67-72 chevytrucks.com message board at half price of new ones. The powder coating has some small rusted beat up areas but I can fix that. The metal bushing sleeves have some minor rust that will need to be cleaned up or I may just replace them. I also found the POL rear sway bar at a 30% discount.
December 16, 2018
I started sanding on the ôbeat upö spots on the trailing arms but it was soon obvious that the rust on the ôbeat upö areas had progressed under the powder coating. I decided to remove all the powder coating and paint the arms. First I tried a flapper disc on the angle grinder but that just made a melted mess. I then searched and found that Eastwood sells Down To Metal stripper for powder coating. Thinking this is just paint stripper I tried some Aircraft Stripper I already had, it worked. Some areas took a couple coats but it all came off. I will hit the arms with gloss black POR-15.
December 18, 2018
I painted the arms with black high gloss POR-15. For the rust in the bushing sleeves I got a 3/4" X 4" brass spiral wire brush and ran that through the sleeves a few times to clean it out. I also ran the brush through the u-bolt and spring mount holes. I will drill and tap the holes for the sway bar as soon as the bar gets here. But this is a long term project so installation is a way off.
It has been several days since I painted the cowl so this afternoon I reinstalled it along with the leaf guard. It went pretty well and looks pretty cool. The worst part was getting the tape off all the places I tapped that needed protection!
December 20, 2018
But soon that feeling of success left. The third time I opened the hood I heard a scraping soundůyep the hood hit the cowl and took off a chunk of paint! Since the cowl and the hood donĺt play together well I need to figure out why they. The is a lot of side to side movement in the hinges which I have discovered is a common problem with old GM hinges and their rivets. So the first thing is get new hinges. Rockauto came through but I thought the hinges would have come with the springs, they do not. Rockauto came through again. Getting the springs on the hinges was tough for an old man with a bad shoulder. I ended up mounting the hinges on my work bench and using a huge screwdriver to pull them in position.
December 23, 2018
One thing I did notice about installing this cowl was how difficult it was to get seated and its position was about ╝ö away from the windshield, this canĺt be right. Looking at how the right side sits in relation to the fender verses the left side I saw there is a curve on the end of the fender that is interfering with the cowl. I donĺt know if this is a fender position issue or what but I cut off the curve about ╝ö and the cowl slide right into place very close to the windshield. I also install the rear screws first which use speed nuts and then the sheet metal screws in the front and finally the two bolts on the ends, much better. Another issue was several of the sheet metal screw holes on the front of the inner cowl are stripped, damn GM and their sheet metal screw mentality. I drilled new clearance holes in the cowl and mating holes in the inner cowl, kind of stuck with using sheet metal screws. I donĺt want to leave the old holes so I filled them. Since the cowlĺs new paint it messed up, dammit, I need to repaint.
December 27, 2018
I sanded off the clear and got the base coat back to where I can fix the flaws hood clearance created on the cowl. I got primer on it but am going to wait until I get the hood back on and I am sure I have fixed the clearance issues before I put on color.
January 1, 2019
Projects have a way of getting out of control. The PO did not do a good job of removing rust and applying rust protection when he ôbuiltö this truck. I was wondering what was living inside the front fenders since I was not thrilled with what I found inside the rear fenders. Since the hood and cowl are off this would be a great time to find out, plus I can remove the fender emblems which I have wanted to do for a long time. Typical of GM there are a ton of fasteners to get the fender off, but it really did not take too long. There was some rust, mainly on the bottom of each corner, but nothing major. The driver side was worse than the passenger side. Time to sand and spread some POR-15. I filled the four holes that held the emblems on but it looks like the PO put these on before the paint fully hardened and there are noticeable marks in the paint. The are some other chips and scratches one the fenders so I was going to fully paint them anywayůů.if it ever stops raining.
January 2, 2019
I started body work on the fenders. Other than smoothing out the emblem holes, fixing a few paint chips and sanding the clear off to get a good painting base the outside should go quickly. But it took me all day the get the clear sanded off both fenders. I found some filler around the front corners but other than that the fenders looks solid. It has been a long day, I need beer!
January 3, 2019
Now for the tough part, Cleaning the insides and covering them with POR-15, this will take some time. Again it took most of the day and two 4 oz cans of POR-15. After that dried I followed that up with bed liner like I did to the rear fenders.
January 4, 2019
Of course I canĺt leave good enough alone. My old theory is all engine compartments should be blacků.I could be wrong. The PO had painted it, along with everything else silver but in this truck it is going black. I used satin black on the inner wheel wells so I will continue this. I painted the top inside portion of the fenders black leaving the very top where it wraps to the outside silver. The plan is to paint the firewall too but that might be tough with the engine installed.
January 5, 2019
With all the preliminary work on the fenders and cowl done I need to paint them. Everything is off the truck so I need to come up with a way to mount it for painting. The cowl is simple but getting the fenders where I can reach all the paintable surfaces is going to be a challenge. This winter has been one continual rain storm with tiny windows of decent weather. But next week looks promising.
January 7, 2019
I did some final sanding on the fenders and cleaned out the garage. For my paint stands I used a few pieces of wood, some tie wraps and some eye bolts to secure the fenders to my work table. This will give me enough access to all sides. The cowl I put a table extension section on a homemade stand. So I am ready to paint tomorrow.
January 8, 2019
Or so I thought. It was raining when I got up, but the all-knowing meteorologists promised it would clear in the afternoon. It did clear up and I at least got the primer on. But I will have to continue this tomorrow.
January 9, 2019
Before I put on the basecoat I had to wet sand the primer with 400 grit. I heated up the garage and did the sanding in the morning so I can have a rest period before basecoat and clear go on. With the sanding done I laid down three coats of base. After lunch and put on three coats of clear. This was a long day, now I have to put this truck back together.
January 10, 2019
I brought both fenders and the cowl into the house where it is warm to cure. I also took the grille and roll pan assembly off and took them inside too. Seems like I am going in the opposite direction but there is a plan. I cleaned out the garage of the overspray so I am ready for assembly. I want to allow the fenders and cowl to cure for a few days which gives me time to do a few other things I want to do first. One of those is to add some bars between the front frame members I cut when I removed the bumper and installed the roll pan. The bars are door crash bars I pulled out of a Z28 and are thick wall DOM 1 Żötubing. Since the complete front is off the truck getting to this area is pretty easy. I drilled one żö hole in each frame and punched out rivets for the radiator support. I drilled those out on both frame members for the bars. The bars will have żö threaded inserts welded to them so the bars can be removed if needed.
January 12, 2019
When I first installed the front roll pan I could not get it to sit even with the bottom of the grille, this bothered me. Now that I have the grille and the roll pan off the truck as an assembled unit I am going to try to fix the problem. It looks like I can manipulate the mounting holes a bit to slide the pan back to make it fit. The major problem is getting the pan and radiator deflector panel installed at the same time. But now I realize I can bolt the pan and the radiator deflector to the grille and install it all at the same time before the fenders go on. I did have to fabricate a new defector mounting system. For some unknown reason the radiator deflector does not come close to fitting on the truck anyway so this should be an improvement.
January 13, 2019
On the verge of sleep last night I realized the new mounting bracket system for the radiator deflector has a problem. While this will work there will be no way to remove the radiator deflector without removing the complete grille assembly, that would not be good. This is mainly because I used nuts and bolts to attach it, should have tapped the brackets. I have decided on a completely new radiator deflector and trash the messed up one I have now. I will make this from a fiberglass sheet and some new support brackets that the fiberglass will bolt to.
January 14, 2019
While I wait for the fiberglass to be delivered I thought I would paint my firewall changing it from body color silver to black (because all engine bays should be black, LOL). I sanded the clear off the best I could. It was tough getting to the recessed area behind the engine but I got it fairly well covered.
January 15, 2019
I was looking over the totally exposed front end checking things out I noticed several bolts missing. Both front inner fenders have one bolt missing at the radiator support because the welded nuts were broken off. It was easy to get a nut on a bolt so I fixed that. I found the same issue for the bolt that holds the battery tray to the inner fender, little tougher but I got a nut in there too. Also one of the bolts holding the fender mounting tab is missing on the driver side. Unfortunately the bolt that is missing because the captured nut threads are pretty messed up and will not tighten. The bolt will go all the way through but I had to massage the sheet metal a bit to get a nut to fit.
January 16, 2019
The fiberglass came in last evening so I started fabrication on this piece. But because the front end needs to be on to get accurate measurements I can only get the curve of the pan end cut and will have to leave the rest until the fenders and grille are installed. I attached a couple angle brackets to the radiator support for this new deflector to bolt to. I also made some braces for this, tapped holes in them for the fiberglass attachment, mounted them to the grille-pan assembly and screwed the fiberglass to the braces. But again I will have to wait before I can cut this assembly to size.
January 20, 2019
My plan for today was to get the grille assembly installed so I could size the braces and fiberglass radiator deflector I made. But after getting the grille assembly on I realized that the only thing I could bolt it to is the hood latch so I could not tell if it the square or not. It needs the fenders to get it aligned properly. Again I am new at C10 assembly and had a lot of issues getting all the bolts to line up. I finally loosened or removed all the bolts holding the inner fender on and that allowed me to get the fender j-nuts to align with inner fender bolt holes, GM grrrrrrrrrrrrrrrr!!!!!!!!! Alignment on this fender is horrible as it was before, small gap at the top of the door, huge gap at the bottom. This basically took all day to get one fender on so I will go at the other side tomorrow.
January 21, 2019
Obviously I learned a little yesterday, but it really didnĺt help that much. The first thing I did this morning was get the inner fender loose. Then I put the fender bolts on loosely installing the upper rear bolts then aligned it with grille. I put on the inner fender to fender j-nut bolts on and tightened everything. This went much smoother that yesterdayĺs fiasco. However alignment is worse on this side. The door gap is too small from the middle down. I need some expert advice on how to fix the alignment.
January 22, 2019
Well this has not been a good week. The fenders are on but alignment is horrible and I canĺt live with this. Looks like I am going to have to take the grille assembly off again, loosen all the fender mounting bolts and try again. This time I will attempt to get the fenders aligned before I attach the grille assembly. I think the doors need major alignment too, they never did fit right. I may be in over my head on this project.
January 24, 2019
I am nothing if not persistent. One more try at this alignment stuff. I started with the passenger side since that side was closer to a real gap than the driver side. I took the grille assembly off figuring to get the fenders aligned first was a better plan than the way I did it before. It was a fight but at least I got it very close to the way it was. I also got the driver side to look like it was, The door certainly needs adjusting to get the gap correct. I put the grille assembly back on. I still have to put on the cowl and then the hood, I hope the hood fits correctly after all this work!
Januray 25, 2019
There is light at the end of this tunnel. Today I got all the fender bolts tightened, put the headlights back on and the radiator top panels. I also temporarily installed the cowl to be sure of its alignment. Again it is as close as it was before. Now all that is left are the new hood hinges and the hood. I will touch up the small paint chips on the back of the hood before we install it. This time I want to install the hood before I put on the cowl to lessen the chance of them hitting again.
January 26, 2019
I didnĺt get much accomplished today. The hinges are on. I worked on the paint chips on the hood and the passenger door, hit them with some silver and a couple coats of clear. It is not perfect but it will have to do for now.
January 27, 2019
I have to wait to put the hood back on until my buddies are free, looks like Saturday. In the mean time I decided to work on the doors. They have a few issues. There are some bad spots, possibly rust bubbles or poorly cured filler in the concave section near the top of the doors I want to address. Since I am in that area it is a good time to address the mirrors. The mirrors I have are nice looking but are damn near useless. They sit too low and too far forward. I filled all the holes in preparation of repositioning them to be more useful. Of course this will require more painting. But painting the entire cab in planned so for right now I will just seal these areas.
Another issue are the vent windows. These have never opened in the two years I have owned the truck, it is time to fix that. I took the door panels off and spray silicone lubricant on anything that would move. On the outside I sprayed it on all the rubber seals for the vent windows. Then I got gutsy! Using a small block of wood I tapped on the vents to try to persuade them to open. Eventually they opened and actually swung very easily. It is still tough to close them and get them latched, not impossible but tough. Hopefully the rubber will soften up some and make that easier. When I pulled off the driverĺs door panel I found a spring loaded rod that was not attached to anything. This might explain why latching this door is sometime tough. Turns out it should hook over the latching mechanism where the door handle contacts it to open the door. It wasnĺt that hard to get it back where it should be.
Another PO surprise. This truck has a 1967 passenger door and a later model driver door, figures. You can tell because only 1967 doors have a reinforcement plate inside for the outside door handle. This makes it weird to install new door handles because of the angled bolts the 1967 used and nobody makes door handles for a 1967 C10. The PO simply used a nut as a spacer to get around the crazy shaped reinforcement panel. I used a large thick washer trimmed to fit instead of that nut. My plan is to change the handles and the locks from chrome to black keeping with my black and silver theme. I saw a YouTube video about Dupli-Color Shadow black chrome, I am going to give this a try. If that doesnĺt work I will see about getting them powder coated.
February 2, 2019
It is hood reinstall day. Last time we did this it all went pretty good, I was hoping we wonĺt run into any issues. But since I had the fenders off I was really concerned about alignment with the fenders. The fenders did require a little shimming to get the gaps decent. Getting the hood to align with the front of the fenders was tough and it is still sitting high in the back, worse on the driver side. I have read some posts about hood alignment and will give it another try tomorrow.
February 3, 2019
According to the hood alignment post I downloaded off the internet I need to loosen the rear hinge to fender bolts and raise up on the front of the hood. This is supposed to pivot the hinge and lower the back of the hood. It worked!!! I also loosened the hinge to hood bolts and pulled the hood forward to come even with the front of the fenders and increase the gap at the cowl. Finally I installed the cowl with the leaf guard. The hood, cowl and fenders are on and the gaps are as good as they were when I started the project so I am declaring victory.
February 22, 2019
I am putting the cosmetic stuff on hold for a while and addressing some performance stuff. I still have the tubular trailing arms and rear sway bar along with the rear disc brakes sitting in my dining room. It is time to clean that out!
It has been several months but the trailing arms are ready to go as is the rear sway bar so I am going to install all this. First I will need test fit all this stuff. During this test I will add 1ö lowering blocks to see if I can get this truck to sit more level. Hopefully 1ö will be enough and the pinion angle will not be messed up. If this all works that way I will mount the sway bar to the frame and determine where to drill and tap the holes in the trailing arms for the sway bar bushing mounts. Think it will be easier to remove the trailing arms after this test for drilling and tapping. I will then reinstall everything and torque all the mounting hardware to spec.
February 25, 2019
Today is rear stance test day, well almost. I supported the frame at the front end and ahead of the center cross member and supported the rear axle at full droop. I unbolted the bottom of both rear shocks. Next I unbolted the left side bottom spring mounting bolt from the trailing arm, removed the u-bolt nuts, pulled off the shock mount, lowered the trailing arm and took out the u-bolt. Then I removed the front left side trailing arm bolt, which for a weak 73 year old was not easy, and pulled the trailing arm out of the truck.
For assembly of the new stuff I installed the new longer u-bolt around the axle which would have been easy if their spacing was correct, it wasnĺt. With a lot of effort I finally got the u-bolts on and put the one inch lowering blocks under the axle. I then greased the bushing and put the front of the trailing arm into its bracket and bolted it in place. Getting the axle u-bolt through the new trailing arm and shock mount was also a PITA but finally got the nuts on. Of course the new u-bolt nuts were bigger than the ones I took off and required me to get another new socket! I reattached the spring and shock. I was going to repeat the process for the right side but all I managed to get done was remove everything when I ran out of energy.
February 26, 2019
The left side was such a pain to assemble but I learned a few things so the right side started out a bit smoother. Right up to the front of the trailing arm mount. This took hours, just could not figure out what was wrong. I eventually used a ratchet strap and a crowbar before I could get the bolt to pass through the mount. Then there was there was dealing with the panhard bar. I figured I would need to use the ratchet strap to get it lined up, but the cheap ratchet strap broke just when I needed one more adjustment, guess Iĺll find a stronger one tomorrow.
February 27, 2019
I got a bigger, stronger ratchet strap and pulled the panhard bar into place. Then I attached both springs and tighten all the bolts. I took the truck off the stands and pulled it out for a VERY short drive to make sure it all set well and checked to see if the stance is what I wanted. I am pleased with the stance of the rear but now of course the front looks like it should go down more too. But there is no way I am going through this process again. So I need to figure out how to drill and tap the holes for the sway bar without removing everything. I really need this thing on a lift!
February 28, 2019
The u-bolts I used were for two inch blocks and are way too long for the one inch blocks I used so I cut them off. I got the e-brake cable run though the bosses on the trailing arms. All that is left before I start on the sway bar is to torque the u-bolts and the front bolts on the trailing arms.
March 1, 2019
I got the huge pound feet of torque for the u-bolts and trailing arm bolts done, not easy but I got it. I managed to get the sway bar positioned on the frame, set the wheels down at ride height and marked the trailing arms for the bushingĺs mounting holes. Since I changed to POL trailing arms drilling them for the bushings is a bit scary. The arms are on an angle and the bar sits straight leaving little room for error.
March 2, 2019
Now that I have installed the 1 inch lowering blocks on the rear and it looks good I think the front needs to drop that same 1 inch. I used Belltech lowering springs on the rear so I ordered a set of 4700 springs which are 1 inch lowering springs and their Street Performance 2103HA shocks for the front.
March 5, 2019
Changing the springs on the front is much more involved that changing the rear springs. I watched a bunch of videos to make sure I know what I am doing. There are seventeen steps involved for each spring not including getting the truck on jack stands and removing the wheels but I think I am ready. The springs and shocks arrived today so tomorrow I will start tearing the truck apartů.again.
March 6, 2019
I got a late start on this project today but I did get one side done. It went much easier than I thought it would. Getting the spring out was uneventful. To tell the truth the only thing that was tough was the new shock. The bottom bushing would not slide into the bracket on the truck. The metal insert on the shock was wider than the rubber bushing so I ground it down until it would fit. Tomorrow I will get the other side done and see if this achieves the results I want.
March 7, 2019
Day two on front spring swap. I am an experienced expert now, LOL, so this should not take long. But once again I got a late start. Damn cold weather, this is Georgia, should be getting warm by now!!!! I got the other side completed, no issues this time.
So did it achieve the results I wanted? HELL NO!! It looks like I got suckered by the old spring sagging thing, I measured the truck with the old springs and got 29.75 inches to the wheel opening. With the new 1 inch lowering springs I got 30.25 inches. DAMNIT I just knew that was going to happen!! Now what to do is the question. I guess I will cut the old ones and see what happens.
March 8, 2019
Well that was two days and $140 spent for nothing! I am not a happy camper. But what the hell just the joys of hot roddingů.right? So today I am cutting the old springs. I measured to cut Żö off the bottom of the springs and see how that works. The result was very close to the look I was after. I am now happy, although Iĺm still out $140!
March 27, 2019
I finally got the rear sway bar on. As usual with sway bars getting it in the right position takes some time. This has to be vertical, this has to be horizontal and this has to be square. Worse part was drilling and tapping holes on the trailing arms which are on an angle lying on my back under the truck was not fun. I greased up the bushings, torqued the end links and the bar is on.
March 28, 2019
As with any suspension modification the question is ôdid it make any differenceö? The answer is yeah, quite a bit. With the other modifications I have done, lowering the height, new high performance shocks and the larger than stock front sway bar, the truck cornered pretty nice. But the addition of the rear sway bar has made it much more neutral when pushed hard in cornering. It had a bit of understeer before all that is totally gone. The steering in the truck is GMs variable ratio quick steering box so you have to be careful not to oversteer, there will be a learning curve!
April 4, 2019
After a week of dealing with non-auto projects I am finally getting back on the truck. I made some DOM bars to fit in between the front frame rails where I cut them when I installed the front roll pan. These will give the radiator a little protection plus give me a better place to jack the front up.
July 26, 2019
It has been a long time since I played in the garage. I have spent the last two months working on house projects that took much longer than I plannedůtypical. But I am back on the truck. This time to address the poorly fitting front fenders. The door gap on both fenders is not good. I am not a body man and have never played with panel gaps and it shows. So I did some research and discovered several things. Number oneůI installed all this in the wrong order, I should have got the fender to door gaps right before doing anything else. Number twoůthe previous owner used the wrong radiator support mounts and even with that they were different on each side. I picked up a set of 1967-68 support mounts. I am hoping using the correct support mounts will allow me to get the fender to line up right.
July 27, 2019
So after removing the 529 screws, bolts and nuts I is finally completely apartůagain. I cleaned everything before I started reassembly. First I loosely installed the radiator support using the new mounts. Then I installed the driver side fender. This would have been easier with another set of hands but I got it pretty close. It did require a lot of trial and error and several shims and some grinding but it is much better than it was. I then did the same procedure for the passenger fender. Then I tightened the core support mounting bolts. Of course the big question now is will the hood fit! I have a long way to go before I can get the hood on though. I need to get the radiator and fans installed as well as the inner fenders and secure all the wiring again. But while I got this all apart I am thinking I should address the leaky steering box since it is exposed now.
July 29, 2019
I have run into my first problem. The new three core radiator fits great but my home modified Ford Taurus two fan setup is not going to mount as it did with the two core radiator. I have tried to make it fit but it is just not going to work. So to make this easier and faster I have ordered an aluminum Champion three core with a two fan setup. I used Champion on my AMX and feel they make a great product.
July 16, 2020
Sometimes you just do idiotic things. I know about bump stops, I know you need to check for rear axle clearance when you lower the suspension. Did I do that? Of course not! But it finally dawned on me after reading a thread on the message board, so I went out and looked. OMG!!! I have only a wide finger clearance between the u-bolts and the bump stops. I need to amend that. I could simply cut off the ones that are in there but they look pretty old. Brothers Truck sells a stock type bump stop that is two inches shorter which I think is as good as I can get without a ôCö notch. The old ones came out with little effort, hopefully the new ones will install as advertised. Then I thought I should look at the front bump stops too. Whoa, the a-frame is sitting on the bump stop. That will certainly needs to be addressed as well. The consensus for this issue is to just remove the front bump stops and possibly its mount too. Removing the mount would be tough since it is welded in. Getting all the bump stops out was easy and it seems to make a difference in the ride. Removing the front ones did lower the front another 1/8ö so they needed to go for sure. I have not received the rear ones from Brothers yet.
July 19, 2020
I really believe this truck hates me. While I wait for the rear bump stops to arrive I took it out for a cruise when suddenly I hear a distinctive rattling that sounded like it was coming from the engine. I wasnĺt that far away so I carefully took it home. Fortunately it was not the engine itself. The alternator bearing had died and the pulley nut and fan were completely loose. But trying to find a replacement alternator has turned into somewhat of a hassle. Nobody local could come up with one so I ordered a remanufactured ACDELCO 19135736 17SI 120 amp which is for a 1985 Chevy Impala that uses a serpentine belt. But of course there are issues! First the pulley is not the same as I had on the old alternator so I swapped that. The wiring is on the opposite side, actually a good thing. The bracket I have will not work, the section that has the slot for adjustment will not go around this unit and even if it did the slot is ╝ö and needs to be 3/8ö. I am going to have to design another bracket.
July 23. 2002
I tried many ways to get the old bracket to work but finally gave up. I made a new temp bracket from ╝ö plywood....twice! (wood is cheaper than aluminum). Basically it is the same as the old one but it fits around the new alternator. That worked great so I ordered some ╝ö aluminum plate to make a real one. I will be adding an additional brace on the rear of the alternator, just for a little more support.
July 24, 2020
The aluminum plate arrived to day so out came the grinder and a lot of scary minutes cutting curves with an angle grinder but it actually came out pretty nice. The hard part was making the adjustment slot, drill a few holes and connect them with a rat tail fileů.old school! As usual some tuning was needed even though I made a couple templates. Rather than using the bolts the old bracket used to secure the alternator I used a stud coming off the engine head and the old bracket sleeve. I used a stud coming off the alternator for the adjustment slot, makes it so much easier to install. There are two studs on the water pump mount for the bracket attachment too. The new additional bracket attaches to the engine head stud at the alternator and the top of the water pump to triangulate everything.
July 31, 2020
After I got this new alternator bracket to my liking I pulled it off to paint it. Mainly because the alternator will only move a little to the right the belt is a bitch getting it on. Basically you have to loosen all the bracket mounting bolts and even then the belt barely goes over the pulley. Once on there is room to move the alternator to the left to tighten the belt. I will live with this. I finally took the truck out for a test drive. All was great until I hear a slight squealůůbelt slippage. I took it home, popped the hood and saw my AC/power steering belt was loose. The nut on the main bolt for the compressor mount was missing and the bolt had backed out. I donĺt remember ever touching that nut during all this because this belt is a separate one from the alternator. Of course the belt did not really survive with about ╝ö of the edge worn down from riding on the side of the pulley, time for a new belt!
August 3, 2020
After the alternator nightmare, the AC bracket unfastening itself 3/8" I thought I was done playing with this truck for a while. Then I had the brilliant idea to change the headlights to 7ö LED versions from a Jeep. That was easier than I thought it was going to be with only slight modifications to the headlight buckets.
September 15, 2020
With all this finished I have been driving it around for a couple weeks. Then suddenly the engine started running really bad. It would idle fine but if I gave it even the slightest throttle under load it fell on its butt. I looked for vacuum hose issues but found none, checked the timing and that was good. Then I noticed the fuel pressure gauge was not reading anythingů.weird. The next morning when I fired it up the pressure gauge read 7 poundsů.good. I took it out for a short drive but the same problem started immediately. I stopped and popped the hood to check the pressure gauge, it read 3 pounds at idle and will not move even if I rev the engine, not good. So I made a list of possible causes. Fuel pump which is fairly new. Leaks in the fuel lines is possible since they are new braided lines and have an inline filter and there are two hoses linked together. The tank is also new so there could be contamination in either or both of the inline filters I have. I tried adjusting the fuel regulator but it will not change the pressure up or down so that could be bad or just not getting enough fuel. I guess I have some debugging to do. I will start by eliminating the regulator and the pull the filters and see if there is anything in them. Of course that pressure gauge could be bad too.
September 16, 2020
This morning when I started the truck the fuel pressure read 7 pounds again. I think it is that heat related thing with fluid fill gauges. There also is the possibility of water in the fuel so I added a bottle of Stabil and topped of the tank with new gas. I took out the regulator, the second filter and the braided hose replacing all that with a new rubber hose. It seems better but there is still surging with the throttle even slightly advanced.
Septhember 23, 2020
Back on the truck after a week. I pulled off the main fuel filter and replaced it with a clear one so I could see if there is anything ugly going on. I took the main filter apart and there is ugly! Some sort of black stuff, no clue what it is, almost looks like fur! I cleaned the filter and blew out all the fuel lines. But if there was stuff in the lines it is quite possible it could have gotten to the carburetor. I pulled the primary float bowl and metering block off but found everything to be very clean. I took out the idle adjustors and sprayed carb clean in every orifice. I took the jets out and made sure they were clean. I put it all back together with new gaskets and while I was in there I replaced to power valve.
September 24, 2020
I reinstalled the carb and took the truck out for a drive. IT IS FIXED!!!!! No real clue as to what the actual problem was but I'm thinking it was debris in the hoses or the tank some of which got the carb. Whatever it was seems to now be gone so I am calling this fixed. February 28, 2024
Oh wait.......there is something that needs fixing that I have known about even before I actually bought the truck. That is the leaking steering box. Right after I bought the truck I did some research and like others discovered that the '67 has a unique frame and to use anything not specifically made for a '67 will not fit without modifying the frame. But I went ahead and bought a Saginaw steering box for a 1980 - 1991 Chevy C10. But still thinking I needed to modify the frame I never got around to swapping it. But now is the time. After a lot of struggling I finally got the leaky beast out and ...NO WAY!! That leaky box is exactly the same box (7802644) I bought several years ago!!!!! There is no way I can get that heavy thing installed myself so I will either have to come up with some ingenious plan or need to recruit some muscle. á
March 10, 2024
Today was a day of frustration. My plan was to use some threaded rod in two of the holes on the steering box to make it a bit easier to get it on the frame. That did work, but when I tried to get the intermediate steering shaft to align with the box I discovered it was too long. It seems like it would move up a little but not enough. I need to do some research to see how to get all this crap to line up!! á
March 11, 2024
I spent hours on the internet last night trying to see how to get this to work. Not a lot of help, mostly just say remove this, connect that but nobody shows how to actually do that. But after watching a ton of videos I got some clues. First have the pitman arm attached to the box and drop it into the idler arm. Next DO NOT bolt the box to the frame yet. Make sure your steering wheel is centered and the box is centered too. Push the box toward the front of the truck to allow clearance for the rag joint. Push the rag joint onto the box splined input and install the bolt. Bolt the rag joint to the steering shaft. Now the fun starts!!!!! You need to get the box aligned with the bolt holes in the frame. This should be a two person job, especially when one of them is old and weak! But anyone who knows me well knows I will only ask for help when all else fails. Using my jack to push the box up and after about 175.76 attempts I finally got the damn thing lined up and the four bolts on. I tightened everything but not torqued.
March 12, 2024
One of my favorite things is torquing bolts to huge lb/ft....NOT! The Idler arm gets 70+ lb/ft, the Pitman arm gets 125 lb/ft and the steering box gets 110 lb/ft. The only ones that were difficult were the steering box bolts because they are inside the frame. I could have taken off the sway bar to make it easier and jacked the truck three feet in the air so my long torque wrench could be moved, but I did not do that. Eventually I got the front ones torqued and then realized I could get the rear ones from the top.
March 14, 2024
After all this I finally got everything bolted back in place, but of course the pump pulley is not lining up with the AC, the tensioner and crank pulley...again. I messed around with some spacers between the pump mount and the block, finally settling on a 1/4". Then I attached the hoses and filled it all with fluid. I decided to bleed the system first even though most of this stuff is brand new before hooking up the return line. Getting those hoses to line up was quite a struggle. It took about one and a half quarts to fill the system. I turned the steering wheel a lot to get fluid to finally come out of the return box fitting. I bled out about a half quart refilling the pump several times. Then I attached the return line back on the pump, topped off the reservoir and cycled the wheel about ten times to be sure all the air was out. It took a while to get the fluid to be at the "cold" mark on the dipstick. It started raining just as I completed this so I couldn't take it out for a test drive. But I started the truck and turned the wheel a few times to be sure it would not make any weird noises and was working properly. I let it idle to get it to operating temperature and checked the fluid level for its hot level.