 |
||
|
|
| |
||
|
|
May 20, 2014
You would think after all the problems I had getting the rear disc conversion done I would not attempt to do my own front disc conversion. Obviously if you think that you don’t know me at all! The precious owner had upgraded the front discs to a newer 1977 AMC setup but it is still antiquated technology using sliding calipers. Once again I have several options. Wilwood makes a great conversion but like the rear conversion it is very expensive. But I decided to go with the Wilwood and picked up kit 140-1194 and hose kit 220-8307.
May 21, 2014
Of course there is a surprise with the Wilwoods, but not one that I didn’t expect. Because the front brakes on this car are not the originals the spindles apparently are also not original and therefore will not work with the Wilwood hubs. The bearing races are too big. Wilwood requires the inner race to be 1.25” and the outer to be 0.75” What I have is 1.375” and 0.875”. I have started a search for the correct spindles, at worst case I may be able to have the ones I have turned down to work but I would rather not do that.
May 24, 2014
Some good news, one of the AMC forum guys has the spindles I need. So hopefully I will have them soon and can start putting these Wilwoods on. It looks like Wilwood mounts the caliper on the front of the rotor so I may have a little more plumbing to do.
May 26, 2014
It will be a while before the correct spindles get here so I took some time to clean up some things before the brake install. Apparently when the PO had this car painted the painter took no time to mask off the fender wells so just like in the rear everything is covered with overspray. I cleaned everything the best I could and sprayed it all with satin black wheel paint. I have found wheel paint holds up very well to the hazards of the road. I had already painted the control arms and strut bars so all that needed attention was the frame, wheel well sheet metal and inner fenders.
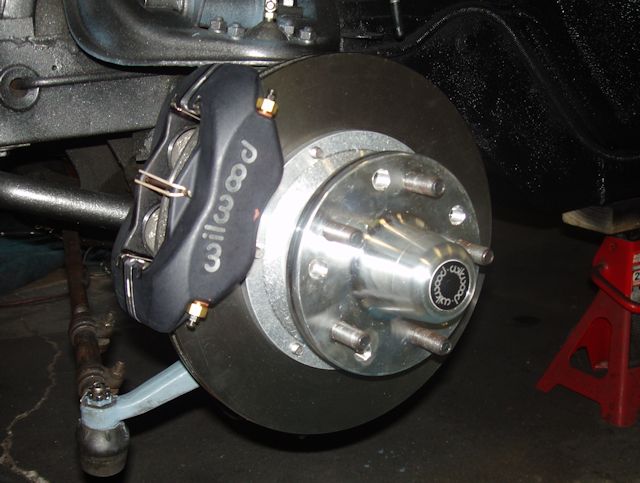
May 28, 2014
As I sit patiently, LOL, waiting for the spindles to arrive I test fitted the hub/rotor assembly. There are several pieces that make this assembly, the lug bolts which are torqued into the hub at 77 ft.-lbs., the hub, the hub to rotor adapter and the rotor itself. The rotor adapter is bolted to the rotor using 5 bolts torqued to 25 ft.-lbs. using red thread locker. Then the hub is bolted to this assembly with 5 bolts also using thread locker and torqued to 55 ft.-lbs. It all fit perfectly. I packed and installed the inner bearings and seals. I packed the outer bearings but will wait until the spindles get here before I can install those. After putting the parts together the first thing I noticed was the huge weight difference between the stock hub/rotor and the Wilwood unit. The stock one weighs in at 22 lbs. while the Wilwood comes I at a mere 11 lbs.
June 5, 2014
I’m still waiting patiently, LOL, for the spindles. My supplier was out of town all last week so the spindles didn’t get shipped from California until yesterday. It will take a few days to get here and I am headed out of town the middle of next week. Hopefully they will arrive so at least I will know these spindles will work before I leave.
June 6, 2014
It never fails. Just when you start to get worried about when some part you ordered will show up it comes the next day. The spindles arrived today and they are exactly what I need. I’ll do a little clean up and get started putting these brakes on the car.
June 7, 2014
I got the spindles cleaned and painted last night so today I started installation. The hub assembly fit perfect on the new spindles and after some trial and error I ended up using one of the spacers supplied by Wilwood to center the calipers on the rotors. But as always not everything went as planned. Because I have custom steering knuckles the mounting bolts Wilwood supplied will not work for the bottom two spindle locations. I had the same problem when I installed the knuckles. The top two install as Wilwood directed with the head of the bolts on the spindle side and the lock-nuts on the knuckle side. But the bottom two must go in the opposite way to clear the steering arm. Before that wasn’t an issue since there was a lot of clearance but the Wilwood hub/rotor assembly is all bolted together and the bottom two bolts for the spindle protruded their nuts and hit on the rotor adapter bolts. I was able to grind the hub bolts to be flush with their nuts to get the desired clearance. With test fitting complete I will take it all apart, add Loctite to all the fasteners and torque everything to spec. The easiest part of this whole thing was the pad installation, simply drop them in and push a cotter pin though to secure them.
June 9, 2014
I added about six inches of ˝” ID silicone hose over the stainless Wilwood hoses where they are close to the steering knuckles to prevent any possibility of wear. I then made small brackets to add loose tie-wraps to keep the hoses in position during steering. I am headed out of town (vacation) for a few days so bleeding is going to have to wait until I get back.
June 21, 2014
I’m back from vacation and it’s time to bleed the front brakes. As I have mentioned above I love speed bleeders but unfortunately Wilwood uses a really small bleeder valve and I have not been able to find a speed bleeder that will fit these calipers. So it back to old school. I recruited one of my scuba buddies to help. It took all of 10 minutes to get pedal pressure. All seems well but a road test will have to wait, seems like the celebratory beer turned into 4 celebratory beers so the test drivewill have to wait.
June 23, 2014
Road test time! The initial stop seems perfect, the first 30 mph stops seemed fine as did the first 60 mph stop. Then I started smelling brakes……..great! I stopped the car and looked at the front brakes , all looked good, but the driver side rear was smoking…OMG I thought the rears were working fine, apparently not. I limped home to see what was wrong. I checked to see if anything felt locked up or even tight, it didn’t. I let the car cool off for a while and pulled the wheel. The rotor looked like there may have been some uneven wear from the outside pad, the passenger side looked perfect. When I took the caliper apart I noticed was the mounting bolt on the back side of the caliper came off very easy compared to the front side bolt, maybe the pads were not sitting square because of this??? The pads looked okay but I hit them with some sandpaper just to be sure there was no foreign material on them. I put everything back together and took it out for a ride. Granted I didn’t try and “panic” stops but nothing got hot. Not sure that’s a good thing or not!